
jawarden
Well-known
Otherwise, on sunny days it's almost always a good idea to cut yourself off at f/11 if you want to see anything in the shadows.
Agree. For me Sunny 16 is Sunny 11.
jawarden
Well-known
One advantage that black & white film has over color film is that you can control image contrast in B&W film by changing the developing time of the film. This is a useful technique when photographing in high contrast scenes, as the examples below will show you.
Thanks for this Chris, nicely done!
When I was first learning photography I thought pushing film was where the fun was and it still has its uses, but I've come to prefer pulling film for most of my images now. On a sunny day pulling makes for an easier negative to print. I like easy.
")
Hans Berkhout
Well-known
Increasing contrast can also be achieved by using a long exposure time. You would need a ND filter most likely. Look into the reciprocity effect of your film. No need to change developing time, so this can be done without replacing the film you have in camera.
Experiment with 10, 30, 60 secs or longer exposure times.
Intensification with diluted selenium is another option to increase contrast of a negative. The negative in question would need to be removed (cut) from the filmstrip for individual treatment.
Experiment with 10, 30, 60 secs or longer exposure times.
Intensification with diluted selenium is another option to increase contrast of a negative. The negative in question would need to be removed (cut) from the filmstrip for individual treatment.
Last edited:
CMur12
Well-known
Sunny f16 works with color transparency film, where the main concern is not overexposing light tones. With transparencies, you let the shadows go in high contrast light because too-dark shadows look better then washed out light tones on a transparency. Sunny f16 basically gives a highlight-biased exposure, which doesn't work well for negs that need an exposure that ensures adequate shadow detail.
Chris, this is an interesting bit of information that I have never seen stated, though it makes perfect sense. (I've always shot color transparency film, anyway.)
- Murray
Bill Clark
Mentor
Thanks Chris.
Your thoughts on this same subject but during making prints in the darkroom.
Your thoughts on this same subject but during making prints in the darkroom.
Chriscrawfordphoto
Real Men Shoot Film.
Thanks Chris.
Your thoughts on this same subject but during making prints in the darkroom.
Its even more useful for darkroom printing.
Darkroom paper is made in different contrast grades. Grade 2 is normal contrast. Single-grade papers are made in grades 1-5. So you don't have much room to lower contrast. Variable contrast papers offer grades 00-5 (00, 0, 1, 2, etc.), so you have more ability with VC papers to lower contrast. BUT, the grade 00 setting for VC papers, at least back when I was doing darkroom printing, had awful gradation, so really only grades 0 and 1 were usable for lowering contrast.
Bill Clark
Mentor
Thanks for your thoughts Chris.
I don’t scan. If I use film I print in the darkroom. Rather than scanning I capture with digital. Just what I do
For when I was in business, I started with film. Truth be known, I thought it was a PITA. I went to digital as soon as I could.
Smiles.
I don’t scan. If I use film I print in the darkroom. Rather than scanning I capture with digital. Just what I do
For when I was in business, I started with film. Truth be known, I thought it was a PITA. I went to digital as soon as I could.
Smiles.
charjohncarter
Mentor
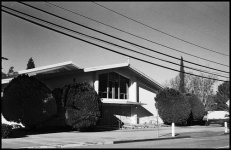
Chris, I have been using the simple formula of 1/2 ISO and develop (time and agitation) to taste (ala Henry Wessel). I live in the Peoples Republic of California where there is lots of sun. Even a sunny Winter day is a contrast blast.
Now an overcast day is not very common here so when using roll film I've tried full ISO mixed with my normal sunny day photos. I have not really tested like you have but it does seem to give an overcast day a little more contrast to the negative. Of course, I develop as with my normal sunny day photos. What do you think?
This was taken in January:
 Arista EDU ultra 100-HC-110h by John Carter, on Flickr
Now an overcast day is not very common here so when using roll film I've tried full ISO mixed with my normal sunny day photos. I have not really tested like you have but it does seem to give an overcast day a little more contrast to the negative. Of course, I develop as with my normal sunny day photos. What do you think?
This was taken in January:
Arista EDU ultra 100-HC-110h by John Carter, on FlickrChriscrawfordphoto
Real Men Shoot Film.
Chris, I have been using the simple formula of 1/2 ISO and develop (time and agitation) to taste (ala Henry Wessel). I live in the Peoples Republic of California where there is lots of sun. Even a sunny Winter day is a contrast blast.
Now an overcast day is not very common here so when using roll film I've tried full ISO mixed with my normal sunny day photos. I have not really tested like you have but it does seem to give an overcast day a little more contrast to the negative. Of course, I develop as with my normal sunny day photos. What do you think?
This was taken in January:
Arista EDU ultra 100-HC-110h by John Carter, on Flickr
John,
Your photos always look extremely flat and lifeless, and too light. The shadows are way too light, there's no tonal separation in the midtones.
I don't think your exposure and developing is the issue, though. Your photos look like photos taken direct from the scanner with no editing done. It is an absolute requirement that scans be edited to bring out the tonality that is locked away inside them. Here's your photo, edited to have the tonality it needs. There are some artifacts around some things, this is from working with a small 8 bit jpeg. If I had the full resolution scan, I could do much better.
Check out this article I wrote about scanning. Notice how my scans straight from the scanner look like your photos always do, then I edit them to bring out the tonality?
https://crawfordphotoschool.com/digital/film-scanning-intro.php
Attachments
charjohncarter
Mentor
Well, I guess we differ, I find your images a little too contrasty especially the one you redid of mine, but that is individual taste. I've read your article on scanning but I actually preferred one written by Colton Allen even though his was for color it allows me more flexibility when I get to my editing program.
I really don't like this image it was done with a film I have trouble with, but it does illustrate what CA sunlight is like a noon.
Oh, you didn't answer my question.
I really don't like this image it was done with a film I have trouble with, but it does illustrate what CA sunlight is like a noon.
Oh, you didn't answer my question.
Chriscrawfordphoto
Real Men Shoot Film.
Well, I guess we differ, I find your images a little too contrasty especially the one you redid of mine, but that is individual taste. I've read your article on scanning but I actually preferred one written by Colton Allen even though his was for color it allows me more flexibility when I get to my editing program.
I really don't like this image it was done with a film I have trouble with, but it does illustrate what CA sunlight is like a noon.
Oh, you didn't answer my question.
I didn't answer the question because it didn't matter. Your scanning and editing style negates any effect development would have.
CharlesDAMorgan
Mentor
Well, I developed both test reels today, one at a stop slower and a quarter less developing.
I think I see more shadow detail in the slower, and definitely less highlight, but only the scan tomorrow will deliver definitive results.
But I'm mystified by how this works chemically, which may be my ignorance of the chemistry of developing.
I think I see more shadow detail in the slower, and definitely less highlight, but only the scan tomorrow will deliver definitive results.
But I'm mystified by how this works chemically, which may be my ignorance of the chemistry of developing.
stevierose
Ann Arbor, Michigan
Hi Chris-
How are you! Long time no email with you. I hope that you, your son, and hour cat are well and weathering the present craziness OK. It's amazing that you just wrote this post as it is something I've been wrestling with lately except in the other direction. Up here in Ann Arbor, we have been having a few sunny bright days interspersed with a bunch of gray blah days. To keep my sanity during the "stay at home" period, I have been going on long walks and drives by myself (which are allowed) with a camera. I've been shooting in the country at farms and also in some of the interesting really old cemeteries (no need for social distancing!). I'm not sure of the best way to "improve" my photos on the gray, blah days (you know what I mean--not days with stormy cool looking clouds, days with gray skies and flat light). So I had considered increasing development time some to boost the contrast, though I can also do that in post I guess. Any suggestions for improving photography on those days? I know that portraits look good under that light with the whole sky as a big diffused light source, but there are no people around to shoot! Thanks! Steve
How are you! Long time no email with you. I hope that you, your son, and hour cat are well and weathering the present craziness OK. It's amazing that you just wrote this post as it is something I've been wrestling with lately except in the other direction. Up here in Ann Arbor, we have been having a few sunny bright days interspersed with a bunch of gray blah days. To keep my sanity during the "stay at home" period, I have been going on long walks and drives by myself (which are allowed) with a camera. I've been shooting in the country at farms and also in some of the interesting really old cemeteries (no need for social distancing!). I'm not sure of the best way to "improve" my photos on the gray, blah days (you know what I mean--not days with stormy cool looking clouds, days with gray skies and flat light). So I had considered increasing development time some to boost the contrast, though I can also do that in post I guess. Any suggestions for improving photography on those days? I know that portraits look good under that light with the whole sky as a big diffused light source, but there are no people around to shoot! Thanks! Steve
Bingley
Mentor
Chris, Thank you for sharing your thoughts and experience on film development to control contrast. Like John Carter, I live in sunny California, so taming contrast is a continual issue. I looked at your tutorial on films and developers. You don’t mention HC110. Do you have a view on that developer? I’ve been using it for years but am always looking for ways to improve my film processing skills. Like you, I use TMax 400 a lot, and develop in HC 110 dilution h for 11 minutes. If I expose TMax 400 at 200 and reduced dev time by 20%, that would apply your tutorial for that developer, right?
Thanks!!
Thanks!!
Chriscrawfordphoto
Real Men Shoot Film.
Chris, Thank you for sharing your thoughts and experience on film development to control contrast. Like John Carter, I live in sunny California, so taming contrast is a continual issue. I looked at your tutorial on films and developers. You don’t mention HC110. Do you have a view on that developer? I’ve been using it for years but am always looking for ways to improve my film processing skills. Like you, I use TMax 400 a lot, and develop in HC 110 dilution h for 11 minutes. If I expose TMax 400 at 200 and reduced dev time by 20%, that would apply your tutorial for that developer, right?
Thanks!!
That would be a good starting point. Most film and developer combinations require 20-30% reduction. It depends partly on the film and partly on the characteristics of the developer. Try 20% and if it doesn't give enough change, try 30% next time.
I don't have much experience with HC-110. I messed with it a little when I was in school and wasn't impressed with it. Kodak did not design it for image quality; they designed it for use in high-volume photo labs running replenished systems where the main concerns were low cost, long life, and fast processing times. That's why the standard "Dilution B" gives very short processing times with many films (and why many people use it with higher dilutions to get more manageable processing times for hand developing).
Compared to D-76, HC-110 gives more grain, and I didn't like the tonal gradation as much either. The only advantages HC-110 has for a home user are that the concentrate lasted forever (this may not be true now since it was just reformulated and there's speculation that it no longer has that long life); it was a liquid rather than a powder; and the per-roll cost was very low.
The thing is most developers are pretty cheap per roll. Even something like Tmax Developer, one of the most expensive developers, still only costs a little over a dollar a roll. I don't care about long life because I use my developers fast enough that they rarely expire....and even when I do have some left over that goes bad, I just throw it out and buy more; the stuff is cheap even for someone like me who lives on a very small income.
To me, image quality is the only thing that I care about. I'm willing to mix powdered developers; I'm willing to spend more money; I'm willing to deal with developers that dies of old age if I don't use them fast enough. I'm not willing to sacrifice image quality for convenience or money.
ACullen
Well-known
Thanks Chris, excellent tutorial. I’ve just invested in a spotmeter in the hopes of producing better more reliable negatives for printing
CharlesDAMorgan
Mentor
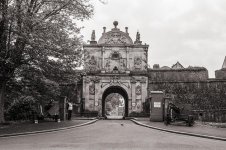
Both reels now scanned. I thought I'd show my most prized result - the 17th century Royal Citadel gate is north facing, and it's only in the summer that you get late evening light that illuminates the gate. The rest of the time you have bright sky to the south, so you either get shadow areas properly exposed at the price of strong highlights, or you end up with something thats a bit of a compromise.
Shot with the same lens (a 35mm Summicron) the first was Orwo N74 at 125 (nominally 400 but I normally get good results at 250) at was shot on an R7 using the spotmeter reading from my Sekonic, which I metered for the limestone of the gate, which is just a touch lighter than zone 5. That film was developed in PMK Pyro for 7 minutes so a quarter off the developing time I use for 250.
The second was on the R4S, same lens, but Orwo N74 at 250 then given 9 minutes 15s. We cannot exclude the possibility that while the shutters in both are the same, they may or may not be exactly the same speeds. I decided that shooting one roll then returning with the changed one would have too much possibility of lighting changes.
at 125

at 250

I much prefer the first for the shadow detail, (I really had to boost shadow detail a lot more on the second in post) the exposure of the gate house and that of the guns, except that there is a bit more contrast in the highlights of the second. YMMV!
The security guard was busy observing, and wondering why this strange man was busy changing cameras!
Shot with the same lens (a 35mm Summicron) the first was Orwo N74 at 125 (nominally 400 but I normally get good results at 250) at was shot on an R7 using the spotmeter reading from my Sekonic, which I metered for the limestone of the gate, which is just a touch lighter than zone 5. That film was developed in PMK Pyro for 7 minutes so a quarter off the developing time I use for 250.
The second was on the R4S, same lens, but Orwo N74 at 250 then given 9 minutes 15s. We cannot exclude the possibility that while the shutters in both are the same, they may or may not be exactly the same speeds. I decided that shooting one roll then returning with the changed one would have too much possibility of lighting changes.
at 125
at 250
I much prefer the first for the shadow detail, (I really had to boost shadow detail a lot more on the second in post) the exposure of the gate house and that of the guns, except that there is a bit more contrast in the highlights of the second. YMMV!
The security guard was busy observing, and wondering why this strange man was busy changing cameras!
Chriscrawfordphoto
Real Men Shoot Film.
Both reels now scanned. I thought I'd show my most prized result - the 17th century Royal Citadel gate is north facing, and it's only in the summer that you get late evening light that illuminates the gate. The rest of the time you have bright sky to the south, so you either get shadow areas properly exposed at the price of strong highlights, or you end up with something thats a bit of a compromise.
Shot with the same lens (a 35mm Summicron) the first was Orwo N74 at 125 (nominally 400 but I normally get good results at 250) at was shot on an R7 using the spotmeter reading from my Sekonic, which I metered for the limestone of the gate, which is just a touch lighter than zone 5. That film was developed in PMK Pyro for 7 minutes so a quarter off the developing time I use for 250.
The second was on the R4S, same lens, but Orwo N74 at 250 then given 9 minutes 15s. We cannot exclude the possibility that while the shutters in both are the same, they may or may not be exactly the same speeds. I decided that shooting one roll then returning with the changed one would have too much possibility of lighting changes.
at 125
at 250
I much prefer the first for the shadow detail, (I really had to boost shadow detail a lot more on the second in post) the exposure of the gate house and that of the guns, except that there is a bit more contrast in the highlights of the second. YMMV!
The security guard was busy observing, and wondering why this strange man was busy changing cameras!
Don't be afraid to edit the scans to bring out midtone contrast; you need that to keep the overall image from being flat and lifeless. Here's your first one, which I edited. It still has good shadow and highlight detail but now has much more tonality in the midtones.
Attachments
Freakscene
Obscure member
Years ago (experiments began in the 1980s), I spent a lot of time getting this sort of thing right. When I say 'right' I mean working out exposure and development combinations that printed easily in pretty much any light I encountered. At the time I lived in Brisbane, which is a lot closer to the equator than Los Angeles and has even brighter, harsher light. I did work out how to manage low contrast scenes but I had a lot of difficulty finding low contrast scenes to shoot so I could work out how to handle them. Of course the details are important but I worked out my EIs, development times, and metering for those scenes. One thing I did work out was that TMax or Delta films needed a LOT less change in development to get the same effect as cubic grain films like Tri-X or Neopan 400, which still was extant then. A 10-15% change in developing time with TMY (original) gave me similar results to a 30% change with Tri-X. I thought that was interesting at the time. Statements that echoed what I found later appeared in a lot of magazine articles and books, but often I didn't have access to all the relevant information. It was before I had access to the internet.
And for a while I carried three of the same cameras for low, normal, and high contrast scenes. It helped that I mostly used 28, 50 and 75 or 85mm lenses, so each body got a lens for a cap. But three bodies and lenses is a lot to carry. In 1995 I took a job working on a feral animal control program in rural and remote areas of northern Australia, and in addition to cameras I carried traps or a rifle, sometimes a handgun, water, first aid kit, GPS, EPIRB, and sundry other things we would need if somehow we got lost away from the vehicle. Three cameras became problematic.
This partly addresses John's question - searching for a one-camera solution I discovered that, particularly with medium speed cubic grain 35mm film, if you are exposing rolls of film under different kinds of light and scene contrast, there is a way to get better results, even if they are not perfect. I used my established normal development time, and varied the EI to compensate for the type of light. EI200 for normal, 100 for contrasty and 400 for flat. These negs did not print as well as the negs from the three camera system, but they were fairly good. So, yes, you can vary the EI and keep the development time and you'll get better negs than if you just shoot everything at one EI.
The final output of photography is a photograph. It might be technically terrible but tremendous, world-changing, even, but the better you can do it the easier you make things for yourself and the people who want to look at it. But technical perfection also doesn't make great photos.
Tonality is very important in B&W photography, but describing it is hard, and what you prefer is mostly personal taste. John's photos look like Henry Wessel and Philip Perkis' in terms of tonality - open shadows, bright, airy and with lower total contrast and moderate local contrast, while Chris' look like Salgado minus the over enthusiastic dodging and burning, with darker midtones and high local and overall contrast. I prefer more open shadows and higher midtones, but it's a matter of taste. In taste, there is no right and wrong, even if your tastes are unusual.
In my own photos, I try to make things look as neutral as possible, largely because strong tonal statements in photos attract like and dislike equally and the technique can distract from the content. At best, arguments about technique still dectract from content. Technique supports vision, and while the ultimate pursuit of 'image quality' might work for some, it isn't always the ultimate, and it's certainly better to have some sort of photo than none at all.
In the last 15 years I've lost a lot of friends. A lot of my photos of them have been used widely, and, paradoxically, profitably for me. A lot of these photos are not technically perfect. When Grant McLennan died in 2006 this ran in a lot of newspapers around the world:

It's shot on Neopan 1600 (an ISO 640 film) shot at EI 3200 and developed in Kodak TMax RS. I couldn't get any Delta 3200 or TMZ that day and it was Neopan or nothing. It still looks good and shows what it needs to. The prints I have are better than the scan, even if the neg is a pain to print.
Just my thoughts on my last day at home before returning to working where I usually do tomorrow.
Marty
And for a while I carried three of the same cameras for low, normal, and high contrast scenes. It helped that I mostly used 28, 50 and 75 or 85mm lenses, so each body got a lens for a cap. But three bodies and lenses is a lot to carry. In 1995 I took a job working on a feral animal control program in rural and remote areas of northern Australia, and in addition to cameras I carried traps or a rifle, sometimes a handgun, water, first aid kit, GPS, EPIRB, and sundry other things we would need if somehow we got lost away from the vehicle. Three cameras became problematic.
This partly addresses John's question - searching for a one-camera solution I discovered that, particularly with medium speed cubic grain 35mm film, if you are exposing rolls of film under different kinds of light and scene contrast, there is a way to get better results, even if they are not perfect. I used my established normal development time, and varied the EI to compensate for the type of light. EI200 for normal, 100 for contrasty and 400 for flat. These negs did not print as well as the negs from the three camera system, but they were fairly good. So, yes, you can vary the EI and keep the development time and you'll get better negs than if you just shoot everything at one EI.
The final output of photography is a photograph. It might be technically terrible but tremendous, world-changing, even, but the better you can do it the easier you make things for yourself and the people who want to look at it. But technical perfection also doesn't make great photos.
Tonality is very important in B&W photography, but describing it is hard, and what you prefer is mostly personal taste. John's photos look like Henry Wessel and Philip Perkis' in terms of tonality - open shadows, bright, airy and with lower total contrast and moderate local contrast, while Chris' look like Salgado minus the over enthusiastic dodging and burning, with darker midtones and high local and overall contrast. I prefer more open shadows and higher midtones, but it's a matter of taste. In taste, there is no right and wrong, even if your tastes are unusual.
In my own photos, I try to make things look as neutral as possible, largely because strong tonal statements in photos attract like and dislike equally and the technique can distract from the content. At best, arguments about technique still dectract from content. Technique supports vision, and while the ultimate pursuit of 'image quality' might work for some, it isn't always the ultimate, and it's certainly better to have some sort of photo than none at all.
In the last 15 years I've lost a lot of friends. A lot of my photos of them have been used widely, and, paradoxically, profitably for me. A lot of these photos are not technically perfect. When Grant McLennan died in 2006 this ran in a lot of newspapers around the world:
It's shot on Neopan 1600 (an ISO 640 film) shot at EI 3200 and developed in Kodak TMax RS. I couldn't get any Delta 3200 or TMZ that day and it was Neopan or nothing. It still looks good and shows what it needs to. The prints I have are better than the scan, even if the neg is a pain to print.
Just my thoughts on my last day at home before returning to working where I usually do tomorrow.
Marty
CharlesDAMorgan
Mentor
Don't be afraid to edit the scans to bring out midtone contrast; you need that to keep the overall image from being flat and lifeless. Here's your first one, which I edited. It still has good shadow and highlight detail but now has much more tonality in the midtones.

Thanks Chris - yes, I think yours actually gets closer to the tones of the walls, which are weathered to a much darker tone than the original granite. It does go to show how controlling for details influences results, but I was concentrating on the 25 pounder guns and how the highlight control perfectly captured the reflectivity of the matt paint on them, so didn't want to take their tones down. This enthusiasm I entirely trace to a grandfather in the Royal Artillery!
Digression aside, I think this technique is absolutely ideal for numerous things I want to photograph here and all I know want for this one is some more interesting sky, and some summer sidelighting to pick out more details. Thanks for sharing!
Share:
-
This site uses cookies to help personalise content, tailor your experience and to keep you logged in if you register.
By continuing to use this site, you are consenting to our use of cookies.