
Chriscrawfordphoto
Real Men Shoot Film.
One advantage that black & white film has over color film is that you can control image contrast in B&W film by changing the developing time of the film. This is a useful technique when photographing in high contrast scenes, as the examples below will show you.
Example #1
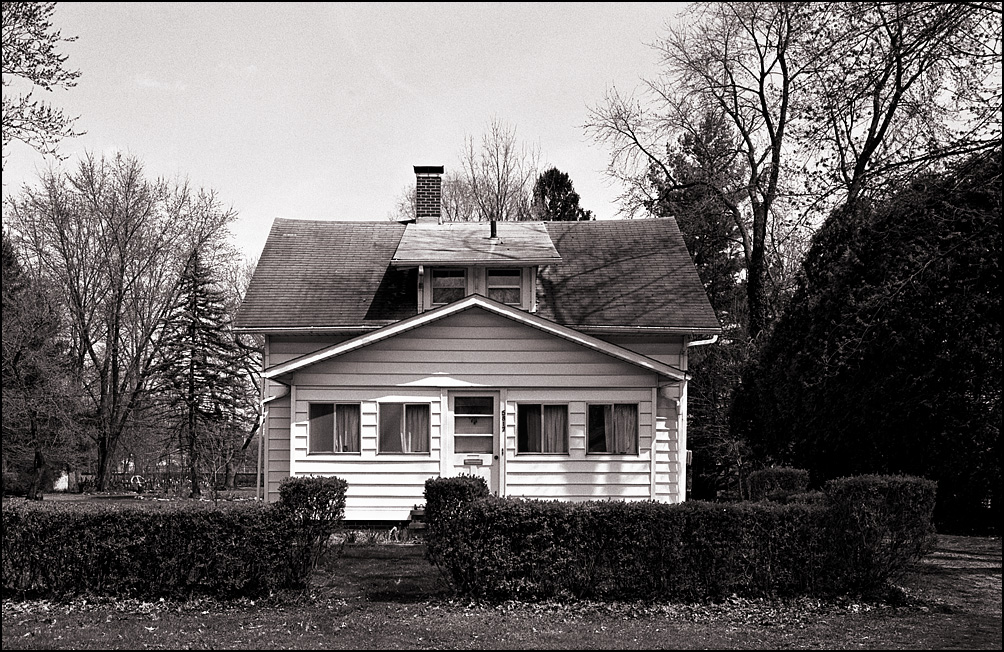
Kodak Tmax 400 film, exposed at EI-320 and developed for the normal developing time of 10 minutes in D-76 1+1 at 68 degrees (20C).

Kodak Tmax 400 film, exposed at EI-160 and developed for 7.5 minutes in D-76 1+1 at 68 degrees (20C). This is 25% less than the normal time.
This house was photographed on a sunny spring afternoon. The sunlight is harsh, casting deep shadows; and the white house means the brightness range of the scene will be even greater. The normally developed example has too much contrast. Notice the deeply shadowed vegetation on the right side of the scene, which is too dark. In addition, there is poor tonal separation within the hedge in front of the house, and there is not enough tonal separation between the hedge and the grass.
The version that was given a shorter developing time has more open shadows, and better tonal separation in dark tones and midtones. In addition, the white aluminum siding on the house is slightly less bright. If this house had wooden siding, there would have been more texture and detail visible in the siding in the reduced-development version (aluminum siding is smooth and textureless).
Example #2

Kodak Tmax 400 film, exposed at EI-320 and developed for the normal developing time of 10 minutes in D-76 1+1 at 68 degrees (20C).

Kodak Tmax 400 film, exposed at EI-160 and developed for 7.5 minutes in D-76 1+1 at 68 degrees (20C). This is 25% less than the normal time.
Like the first example, this house was photographed on a sunny spring afternoon. The sunlight is harsh, casting deep shadows. The covered porch is a lot darker than the sunlit parts of the house. The normally developed example has too much contrast.
The version that was given a shorter developing time has more open shadows, improving the tonality of the part of the house shaded by the porch overhang. It is hard to see it in the small screen-sized images, but the sunlit areas of the white-painted wooden parts of the house show more texture and detail in the reduced-development version.
How It's Done
The amount of reduction in developing time varies depending on the film and developer you are using, and can be anywhere from 20% to 30%. If you look at my Tested Developing Times, many of them show a Normal time and a time labeled "N-1." This is the time you would use for that film and developer combination to reduce contrast. If you do not see an N-1 time listed for the film and developer combo that you are using, try a 25% reduction as a starting point.
Film Speed
You will notice that in my examples above, I shot the normally developed photographs at EI-320 (my normal exposure for Tmax 400 developed in D-76 1+1), but the reduced developing time versions were shot at EI-160. This gave the reduced development films one stop more exposure than the normally developed film.
This is because reducing the developing time also causes a drop in the film's effective speed. With most films and developers, the speed loss is about one stop; so the normal procedure is to simply set your meter to a one stop lower film speed. Because of the speed loss, you must plan to use development to control contrast when you actually shoot the photographs. If you expose at the normal film speed, then decide to reduce developing time afterward, your images will be underexposed.
If you are shooting on 35mm or 120 roll film, you must shoot the whole roll in the same lighting conditions using the same reduced exposure index. Make sure you mark the rolls after you shoot them so that you will know what developing treatment each requires when you get back home!
Can You Adjust Contrast Without Changing Film Developing?
Yes, it is possible to do so. If you scan your film, you can manipulate the exposure using curves in Photoshop to open up dark shadows and bring down overly-bright light tones. If you print in the darkroom on traditional photo paper, you can use a lower-contrast paper (or alower-grade contrast filter with variable-contrast paper). In both Photoshop and the darkroom, further adjustment can be done through dodging and burning (selectively darkening or lightening parts of the image without affecting other areas).
Although you can use a normally-developed negative and adjust the contrast in the darkroom or in Photoshop, it is much easier to work with a negative whose developing has been tailored to the scene contrast. It is always better to start with the best negative possible because it is a lot more work to get a good image from a film that has too much contrast, and the image quality will ultimately be better from the properly-developed film.
Can You Increase Contrast?
Yes, you can increase contrast by using a developing time that is longer than normal. In the real world, this is probably something you will never want to do if you are aiming for a realistic rendering of the subject. It is far more common to encounter lighting conditions that work with normal developing or that require reduced developing. In the 30 years I have been shooting black and white film and developing it, I have never once needed to increase developing time to increase contrast.
Some photographers like very high contrast renderings, which is a valid artistic decision. If you want more contrast, I recommend increasing developing time by 25% (multiply normal developing time by 1.25) for Kodak Tmax 100 and Tmax 400, and Ilford Delta 100 and Delta 400 films. For other films, increase developing time by 50% (multiply normal developing time by 1.5). Tmax and Delta films build contrast faster than other B&W films.
Increasing developing times will not have as much impact on the film's effective speed as reduced developing times do. With most films, you'll see no more than a 1⁄3 stop increase in the film's effective speed. I recommend either shooting at the normal speed that you would use for that film and developer combination or increasing the exposure index by 1⁄3 stop. So, for example, a film you normally shoot at EI-320 would be shot at EI-400 and a film normally shot at EI-100 would be shot at EI-125 when using a longer developing time.
Example #1
Kodak Tmax 400 film, exposed at EI-320 and developed for the normal developing time of 10 minutes in D-76 1+1 at 68 degrees (20C).
Kodak Tmax 400 film, exposed at EI-160 and developed for 7.5 minutes in D-76 1+1 at 68 degrees (20C). This is 25% less than the normal time.
This house was photographed on a sunny spring afternoon. The sunlight is harsh, casting deep shadows; and the white house means the brightness range of the scene will be even greater. The normally developed example has too much contrast. Notice the deeply shadowed vegetation on the right side of the scene, which is too dark. In addition, there is poor tonal separation within the hedge in front of the house, and there is not enough tonal separation between the hedge and the grass.
The version that was given a shorter developing time has more open shadows, and better tonal separation in dark tones and midtones. In addition, the white aluminum siding on the house is slightly less bright. If this house had wooden siding, there would have been more texture and detail visible in the siding in the reduced-development version (aluminum siding is smooth and textureless).
Example #2
Kodak Tmax 400 film, exposed at EI-320 and developed for the normal developing time of 10 minutes in D-76 1+1 at 68 degrees (20C).
Kodak Tmax 400 film, exposed at EI-160 and developed for 7.5 minutes in D-76 1+1 at 68 degrees (20C). This is 25% less than the normal time.
Like the first example, this house was photographed on a sunny spring afternoon. The sunlight is harsh, casting deep shadows. The covered porch is a lot darker than the sunlit parts of the house. The normally developed example has too much contrast.
The version that was given a shorter developing time has more open shadows, improving the tonality of the part of the house shaded by the porch overhang. It is hard to see it in the small screen-sized images, but the sunlit areas of the white-painted wooden parts of the house show more texture and detail in the reduced-development version.
How It's Done
The amount of reduction in developing time varies depending on the film and developer you are using, and can be anywhere from 20% to 30%. If you look at my Tested Developing Times, many of them show a Normal time and a time labeled "N-1." This is the time you would use for that film and developer combination to reduce contrast. If you do not see an N-1 time listed for the film and developer combo that you are using, try a 25% reduction as a starting point.
Film Speed
You will notice that in my examples above, I shot the normally developed photographs at EI-320 (my normal exposure for Tmax 400 developed in D-76 1+1), but the reduced developing time versions were shot at EI-160. This gave the reduced development films one stop more exposure than the normally developed film.
This is because reducing the developing time also causes a drop in the film's effective speed. With most films and developers, the speed loss is about one stop; so the normal procedure is to simply set your meter to a one stop lower film speed. Because of the speed loss, you must plan to use development to control contrast when you actually shoot the photographs. If you expose at the normal film speed, then decide to reduce developing time afterward, your images will be underexposed.
If you are shooting on 35mm or 120 roll film, you must shoot the whole roll in the same lighting conditions using the same reduced exposure index. Make sure you mark the rolls after you shoot them so that you will know what developing treatment each requires when you get back home!
Can You Adjust Contrast Without Changing Film Developing?
Yes, it is possible to do so. If you scan your film, you can manipulate the exposure using curves in Photoshop to open up dark shadows and bring down overly-bright light tones. If you print in the darkroom on traditional photo paper, you can use a lower-contrast paper (or alower-grade contrast filter with variable-contrast paper). In both Photoshop and the darkroom, further adjustment can be done through dodging and burning (selectively darkening or lightening parts of the image without affecting other areas).
Although you can use a normally-developed negative and adjust the contrast in the darkroom or in Photoshop, it is much easier to work with a negative whose developing has been tailored to the scene contrast. It is always better to start with the best negative possible because it is a lot more work to get a good image from a film that has too much contrast, and the image quality will ultimately be better from the properly-developed film.
Can You Increase Contrast?
Yes, you can increase contrast by using a developing time that is longer than normal. In the real world, this is probably something you will never want to do if you are aiming for a realistic rendering of the subject. It is far more common to encounter lighting conditions that work with normal developing or that require reduced developing. In the 30 years I have been shooting black and white film and developing it, I have never once needed to increase developing time to increase contrast.
Some photographers like very high contrast renderings, which is a valid artistic decision. If you want more contrast, I recommend increasing developing time by 25% (multiply normal developing time by 1.25) for Kodak Tmax 100 and Tmax 400, and Ilford Delta 100 and Delta 400 films. For other films, increase developing time by 50% (multiply normal developing time by 1.5). Tmax and Delta films build contrast faster than other B&W films.
Increasing developing times will not have as much impact on the film's effective speed as reduced developing times do. With most films, you'll see no more than a 1⁄3 stop increase in the film's effective speed. I recommend either shooting at the normal speed that you would use for that film and developer combination or increasing the exposure index by 1⁄3 stop. So, for example, a film you normally shoot at EI-320 would be shot at EI-400 and a film normally shot at EI-100 would be shot at EI-125 when using a longer developing time.
charjohncarter
Mentor
Thanks, for the tutorial.
Vince Lupo
Barely Known
Nice post Chris. Good for newbies as well as for us old timers who need reminding.
Peter Jennings
Well-known
Thanks, Chris. Because of the way you explained it, I now understand this concept better than I had.
Chriscrawfordphoto
Real Men Shoot Film.
Thanks, Chris. Because of the way you explained it, I now understand this concept better than I had.
Peter, that's great!
Corran
Well-known
I'm not sure I agree with your statements regarding the meter / EI above.
Shadow density is mostly changed with exposure, not development. Highlights are changed with development, as you are showing here. By giving the film one stop extra exposure, you have raised the shadows up one Zone, from say II to III, and then your corresponding reduction in development reigned in the highlights. The EI of the film hasn't really changed. The meter was giving you an average reading and since the contrast was high, those shadows were placed lower than you wanted.
This becomes a bit more obvious if you use a spotmeter and placed the shadows on Zone III to begin with, using whatever EI you typically would use. Then, generally with that spotmeter you would decide the highlights needed to be pulled by reducing the development.
Some film also is a bit different in this regard. On T-Max 100, for example, I do find a reduction in development also can reduce shadow density slightly, but not so for more traditional films like FP4+. I'm not a T-Max 400 user so I have no comment on that film. This difference, when plotted, is because T-Max 100 has a very straight line when developed even when pulled, while the FP4+ and similar is usually a curve that bends down with reduction in development rather than that straight line.
Personally I made a lot of bullet-proof and unprintable negs back in the day before I really understood the nuances about placing the right shadows on the right Zones and not relying on the idea of a 1-stop overexposure in terms of EI when pulling film, especially when metering with a spotmeter rather than a TTL or incident meter.
Shac
Well-known
Chris - many thanks for this - greatly appreciated because it is so useful and informative
Chriscrawfordphoto
Real Men Shoot Film.
I'm not sure I agree with your statements regarding the meter / EI above.
Shadow density is mostly changed with exposure, not development. Highlights are changed with development, as you are showing here. By giving the film one stop extra exposure, you have raised the shadows up one Zone, from say II to III, and then your corresponding reduction in development reigned in the highlights. The EI of the film hasn't really changed. The meter was giving you an average reading and since the contrast was high, those shadows were placed lower than you wanted.
This becomes a bit more obvious if you use a spotmeter and placed the shadows on Zone III to begin with, using whatever EI you typically would use. Then, generally with that spotmeter you would decide the highlights needed to be pulled by reducing the development.
Some film also is a bit different in this regard. On T-Max 100, for example, I do find a reduction in development also can reduce shadow density slightly, but not so for more traditional films like FP4+. I'm not a T-Max 400 user so I have no comment on that film. This difference, when plotted, is because T-Max 100 has a very straight line when developed even when pulled, while the FP4+ and similar is usually a curve that bends down with reduction in development rather than that straight line.
Personally I made a lot of bullet-proof and unprintable negs back in the day before I really understood the nuances about placing the right shadows on the right Zones and not relying on the idea of a 1-stop overexposure in terms of EI when pulling film, especially when metering with a spotmeter rather than a TTL or incident meter.
What I'm telling you is correct. I always use a spotmeter to place the shadows and check the highlights.
In fact I did test whether the additional exposure was needed when I made the example photos. On the reduced development one, I did an exposure at EI-320, same as on the normal development roll, and one at EI-160. The one shot at 320 on the reduced development roll was, guess what, UNDEREXPOSED A STOP! The one shot at EI-160 matched the shadow density of the normally developed EI-320 shot. I've been doing this for almost 30 years, so I knew what the results would be, but its been awhile since I did a rigorous test so out of curiosity, I did the photo at both the normal exposure and one stop over on the pulled developing roll. I did it on both photos I used in this tutorial plus a third one I didn't use because the first two worked well enough as examples. Every one, same result. It was important for me to have the same amount of shadow detail in both the normal and the reduced development images so that only the highlight densities would differ.
Its simply not true that development has no effect on shadow densities. Every authority on zone system exposure from Ansel Adams, to Phil Davis, to Minor White says the same thing: N-1 development requires one stop more exposure with most films and developers.
The reason that developing times longer than normal do not produce much shadow speed increase is that manufacturers design the films to have their maximum speed when developed to a normal contrast index. Developing beyond that point doesn't do much for the dark tones.
Chriscrawfordphoto
Real Men Shoot Film.
Chris - many thanks for this - greatly appreciated because it is so useful and informative
Shac, you're welcome. I'm glad you found it useful.
Corran
Well-known
Its simply not true that development has no effect on shadow densities. Every authority on zone system exposure from Ansel Adams, to Phil Davis, to Minor White says the same thing: N-1 development requires one stop more exposure with most films and developers.
Adams' famous quote says otherwise. I will review The Negative and see but I don't remember what you say here about N-1 always needing one stop more exposure, unless it was in reference to an incident meter. You said you used the TTL meter I thought. If you used the spotmeter for this photo, at what EI and what Zone was the patio area in?
Of course TMX wasn't out when he wrote the book and as I mentioned, T-Max 100 in my experience has a straight-line drop in density even into the shadows, but I don't have enough experience with TMY to say anything about it. So perhaps it does the same. Do the test with HP5+ and the results may change.
"Expose for the shadows, develop for the highlights."
Chriscrawfordphoto
Real Men Shoot Film.
Adams' famous quote says otherwise. I will review The Negative and see but I don't remember what you say here about N-1 always needing one stop more exposure, unless it was in reference to an incident meter. You said you used the TTL meter I thought. If you used the spotmeter for this photo, at what EI and what Zone was the patio area in?
Of course TMX wasn't out when he wrote the book and as I mentioned, T-Max 100 in my experience has a straight-line drop in density even into the shadows, but I don't have enough experience with TMY to say anything about it. So perhaps it does the same. Do the test with HP5+ and the results may change.
"Expose for the shadows, develop for the highlights."
I just pulled my copy of "The Negative" off my shelf. Here's what Adams says:
"Reduced development affects all zones to some degree, and the densities of the low zones may be reduced to the extent that it becomes difficult to give them 'life' in the print. Therefore, as we apply reduced development, we usually must increase the exposure by 1.5x to 2x."
1.5x is a half stop, and 2x is one stop. In my testing, using a densitometer, most modern films, including Tmax 100, require closer to one stop. Practical experience printing actual photographs in the darkroom and (in more recent times since my health no longer allows darkroom printing) scanning shows that the one stop increase produces better gradation than not giving any increase.
I do not even own a film camera with a TTL meter anymore, and even with my digital cameras I ALWAYS use a handheld meter. I did not meter the porch, I metered the shadow to the left of the house and placed it on Zone III because it was darker than anything on the porch. As I said earlier, I shot the normally developed one at EI-320 and then shot the reduced development image at both 320 and 160 and the EI-160 version matched the shadow density of the normally developed image shot at 320.
It may not apply to every film and developer combination. Adams himself says the compensation should be anywhere from 1/2 to one stop. I stand by my recommendation to use one stop as a starting point. If your own testing shows different, then use what works for you. I'm writing these tutorials to help people who are less experienced learn more advanced techniques. Because there are a lot of films and developers, each combo having its own characteristics, its necessary to give generalized 'starting points' for them to begin with.
Corran
Well-known
If your own testing shows different, then use what works for you. I'm writing these tutorials to help people who are less experienced learn more advanced techniques. Because there are a lot of films and developers, each combo having its own characteristics, its necessary to give generalized 'starting points' for them to begin with.
I agree with this.
CharlesDAMorgan
Mentor
Brilliantly helpful Chris! A really good and clear guide, and fascinating to observe the results.
In fact, I'll give it a try. As I can self load Orwo N74 (notionally 400 but much better at 250) I'll do one roll at 250 and one at 125, and give the first roll 9.15 in Pyro (the same time as HP5+ plus the pre-soak 15seconds) and the second 25% less.
Thank you very much - it is always a joy to read your technical help, it is so clear.
Larry Cloetta
Mentor
Thanks, Chris, for taking the time to do this.
For what it’s worth, Bruce Burnbaum has a well thought out diagrammatic representation of what happens to tone levels, where they end up being placed in Zone System zones, when you increase or decrease development time, in his book, “The Art of Photography”, along with a pages long detailed explanation.
This short video from him covers something different from that discussion in the book, but others might find it interesting, as it is somewhat related to your explanation. Further food for discussion, perhaps.
https://m.youtube.com/watch?v=rlnt5yFArWo
Matching development to exposure in order to get the desired result is one thing, perhaps the only thing, that large format photography makes it easier to do, unless one is shooting entire rolls of film in the exact same lighting and contrast conditions.
Thanks again for posting your explanation.
CharlesDAMorgan
Mentor
I'll look at that later Larry when I can put my feet up.
What a nice way to spend a couple of hours with a pair of cameras (both the same make and shutter, but obviously they may be slightly out on timing). My spot meter did the work (at Zone V it showed half a stop more exposure than the spot meters in both cameras).
The joy of the present crisis is that many old buildings in the city that are normally obscured by parked cars are now clear. One from 1540 remains obscured but I had a lot of fun trying this out today.
presspass
filmshooter
Chris,
Thanks as always. Have you ever tried either two bath or more dilute developer for a longer time, for instance 1:3 D-76 or D-23? The only problem I have with reducing the e.i. of film is the amount of light available in the damp and dreary eastern Pennsylvania weather.
Thanks as always. Have you ever tried either two bath or more dilute developer for a longer time, for instance 1:3 D-76 or D-23? The only problem I have with reducing the e.i. of film is the amount of light available in the damp and dreary eastern Pennsylvania weather.
Chriscrawfordphoto
Real Men Shoot Film.
Chris,
Thanks as always. Have you ever tried either two bath or more dilute developer for a longer time, for instance 1:3 D-76 or D-23? The only problem I have with reducing the e.i. of film is the amount of light available in the damp and dreary eastern Pennsylvania weather.
In damp and dreary light, you'll probably not want to reduce contrast; developing normal will probably work just fine.
I have not tried two bath developing. What I've seen done by others doesn't show any advantage over normal developing procedures, though there are a lot of 'true believers' who've subscribed to the myths around it. Same with stand development. Practice and discipline are how you improve your photography; there's no 'secret special superior developer.' I can understand the appeal, but the truth is that most of the world's greatest photographs were developed in ordinary developers like D-76 used at normal dilutions using standard techniques (and adjusting developing time to control contrast is a standard technique).
What about very diluted developers? Most developers have a standard dilution or range of dilutions that they're designed to work with. Diluting them further causes a lot of problems. Often what happens is the developer simply exhausts before the film is fully developed. The resulting low contrast fools the user into thinking he's found a 'magic bullet' that fixes high brightness range images. In truth, he simply had an underdeveloped film. Reducing developing time with a normally diluted developer is better because the results are more consistent.
LCSmith
Well-known
Great and generous tutorial! Shoot for the shadows, develop for the highlights, as my mentor used to say. He almost always overexposed his film by two stops and cut the highlights in processing. I don't know what he had against highlights.
I have done this sort of thing a few times in bright beach environments, and of course to please my mentor; but now I prefer to embrace the contrast as a compositional challenge.
As an aside, in my experience "Sunny 16" hardly ever means you are actually shooting at f16 and 1/film speed. The only time that would result in a good exposure (provided you are processing normally) is if the light is directly on the subject. Otherwise, on sunny days it's almost always a good idea to cut yourself off at f/11 if you want to see anything in the shadows.
Chriscrawfordphoto
Real Men Shoot Film.
Great and generous tutorial! Shoot for the shadows, develop for the highlights, as my mentor used to say. He almost always overexposed his film by two stops and cut the highlights in processing. I don't know what he had against highlights.
I have done this sort of thing a few times in bright beach environments, and of course to please my mentor; but now I prefer to embrace the contrast as a compositional challenge.
As an aside, in my experience "Sunny 16" hardly ever means you are actually shooting at f16 and 1/film speed. The only time that would result in a good exposure (provided you are processing normally) is if the light is directly on the subject. Otherwise, on sunny days it's almost always a good idea to cut yourself off at f/11 if you want to see anything in the shadows.
Sunny f16 works with color transparency film, where the main concern is not overexposing light tones. With transparencies, you let the shadows go in high contrast light because too-dark shadows look better then washed out light tones on a transparency. Sunny f16 basically gives a highlight-biased exposure, which doesn't work well for negs that need an exposure that ensures adequate shadow detail.
LCSmith
Well-known
Sunny f16 works with color transparency film, where the main concern is not overexposing light tones. With transparencies, you let the shadows go in high contrast light because too-dark shadows look better then washed out light tones on a transparency. Sunny f16 basically gives a highlight-biased exposure, which doesn't work well for negs that need an exposure that ensures adequate shadow detail.
Indeed! Or with digital, where one underexposes with intention.
Share:
-
This site uses cookies to help personalise content, tailor your experience and to keep you logged in if you register.
By continuing to use this site, you are consenting to our use of cookies.