
stephen mcateer
Newbie
If you are new to 3d printing... first be ready to be frustrated. Kind of a steep learning curve to setting up/tweaking/fixing your machine and learning how it and the slicer all interact.
If you don't have a digital caliper get one. There are pretty decent ones on Amazon for around $25 and they are extremely helpful in setting up your first layer height. Print 25mmx25mmx0.28mm (first layer height) squares around your build plate and then use the caliper to measure each and adjust your build plate and/or Z axis offset (if you have auto bed leveling) until your squares are right about 0.28mm. This will save you an enormous amount of frustration later in first layer adhesion and such.
Spends lots of time on the mechanical setup of your machine. Get the gantry mechanically squared (not just forced in to position), adjust wheel tensions...etc...etc.
I wouldn't try printing the Kraken as one of your first pieces. Spend time with other objects as you get your machine setup and calibrated well. Do a couple of overhang tests to see what angle your machine print to before needing supports.
After all of that....
To print the Kraken as designed by Graham....
1) For all the small pieces print them with NO supports. It will make the grips and knobs much easier to deal with and will print fine without supports. Follow Grant's suggestions on what to print with 30% infill vs 100%. Use ESUN PLA+ in black.
2) If you can print to >45 degrees without support set your Slicer to what you can reliably do when you print the body and lens cone. I use 10% infill on supports.
3) It makes cleanup a bit more annoying but use an 8mm brim on all of the pieces. It helps everything stick and reduces warping on the big pieces.
4) I print at a 0.28 layer height for everything and that is a good trade off between print times and quality. Don't try and crank up print speed.. not worth it.
5) When you slice all of the pieces put the amount of material in the name of the gcode files and keep track of how much you use. When you put a new roll of PLA on subtract what you use and you will know how much is left... very handy when printing large pieces. If you use an Octoprint install Filament Manager and it will do this automatically for you.
6) For the film spacers scale them 98% in your slicer, will save you sanding time later. Ditto the rear door pegs and the inner piece of the rear viewfinder.
7) I print at 215 initial and 210 for the rest, build plate 65 iniital then 60. No cooling first layer and then slowly ramp up the cooling as the layers increase.
Hope this helps!
Shawn
Thanks Shawn. A lot to think about.
I got a printer from my brother tonight as he's bought a better one. This one he gave me is an ENDER 3 PRO.
I'll make a note of your advice. I'll also look at YouTube. If I succeed I'll post something here [Don't hold your breath…]
Thanks again.
Stephen.
shawn
Mentor
It’s funny, I see all this 3D printer stuff and imagine how I’d build it from mahogany and brass! Great work, I’m surprised the focal plane is not curved.
It would look awesome in mahogany and brass. Maybe I will try a body in wood filament sometime if it is opaque enough.
But there is also something kind of magic about sitting on my couch, designing a piece virtually, and rotating it and zooming in in virtual space, hitting a few buttons and then the printer down in the basement starts building the design and then walking down there the next day and holding it. It feels like science fiction.
The lens is meant to project on large format flat film. The only panoramic cameras that are curved are either swing lens cameras or pinholes.
Shawn
shawn
Mentor
I got a printer from my brother tonight as he's bought a better one. This one he gave me is an ENDER 3 PRO.
I'll make a note of your advice. I'll also look at YouTube. If I succeed I'll post something here [Don't hold your breath…]
Thanks again.
Stephen.
My bigger printer is a Creality CR-10S Pro v2 which is similar to your ender. Definitely look at squaring up the gantry videos. There are a few good ones out there and lots of bad ones, if the video is just talking about leveling the gantry by just twisting the Z axis rods it is a bad one. You have to take it all apart to put it back together correctly so there is no bias in it. Also watch the Z axis bushings in the gantry, mine came with loads of play in them. Some say to leave them a little loose but if you have ABL that is bad advice as slop there will reduce ABL effectiveness. Mine are tight but I get everything else setup properly first or you might get binding. Check the hot end to make sure it can't wiggle side to side, mine shipped loose and I was getting weird layer shifts till I found that. Lastly look at all the wells and get that setup so it rotates smoothly but has no play. Mine drove me nuts for about a month before I figure it all out.
Shawn
stephen mcateer
Newbie
My bigger printer is a Creality CR-10S Pro v2 which is similar to your ender. Definitely look at squaring up the gantry videos. There are a few good ones out there and lots of bad ones, if the video is just talking about leveling the gantry by just twisting the Z axis rods it is a bad one. You have to take it all apart to put it back together correctly so there is no bias in it. Also watch the Z axis bushings in the gantry, mine came with loads of play in them. Some say to leave them a little loose but if you have ABL that is bad advice as slop there will reduce ABL effectiveness. Mine are tight but I get everything else setup properly first or you might get binding. Check the hot end to make sure it can't wiggle side to side, mine shipped loose and I was getting weird layer shifts till I found that. Lastly look at all the wells and get that setup so it rotates smoothly but has no play. Mine drove me nuts for about a month before I figure it all out.
Shawn
Okay thanks again Shawn. I'm making a note of what you've posted here and will refer to it once I get going.
Stephen.
shawn
Mentor
After building many Kraken's I am trying something a bit different for my next two. Going with fixed focus.
This one (Schneider 47mm f5.6) almost had to be fixed focus due to the flange focal length. It should be crazy wide, might shoot it without a viewfinder. Hard to tell the exact focus point but I am right around 16'. Wide open the DOF will cover from around 8' to infinity.


The second one I am going fixed focus for a snapshot panoramic sort of idea. Wollensak 90mm f12.5 but the lens actually opens wider to somewhere around f8. Designed a new finder for it based off of my 617 design.
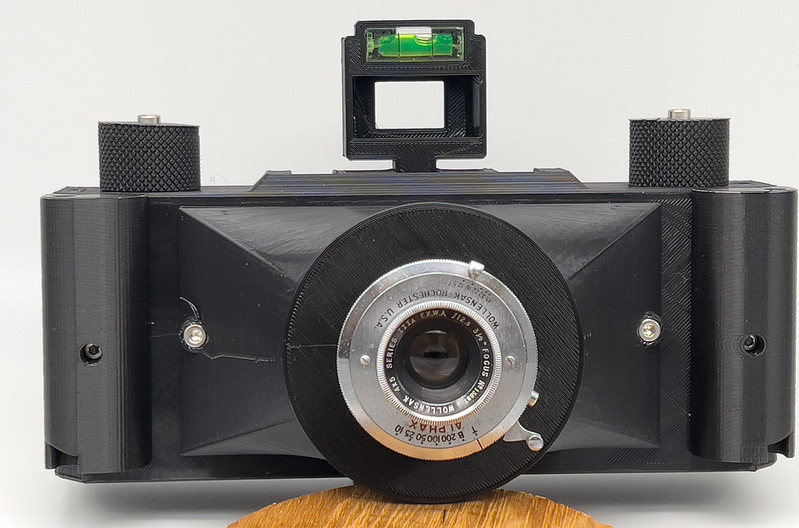
Shutter is intentionally upside down, tilt the camera up to you and all controls are right side up. As it is a press shutter I find this position is more natural to activate the shutter with my left hand. Focus point is around 24-28', if so at f16 it should cover from about 12' to infinity. After I get a roll through this one I might tweak focus point a little with spacers if I want to come in closer.
Hoping to burn some film in them this weekend.
Shawn
This one (Schneider 47mm f5.6) almost had to be fixed focus due to the flange focal length. It should be crazy wide, might shoot it without a viewfinder. Hard to tell the exact focus point but I am right around 16'. Wide open the DOF will cover from around 8' to infinity.
The second one I am going fixed focus for a snapshot panoramic sort of idea. Wollensak 90mm f12.5 but the lens actually opens wider to somewhere around f8. Designed a new finder for it based off of my 617 design.
Shutter is intentionally upside down, tilt the camera up to you and all controls are right side up. As it is a press shutter I find this position is more natural to activate the shutter with my left hand. Focus point is around 24-28', if so at f16 it should cover from about 12' to infinity. After I get a roll through this one I might tweak focus point a little with spacers if I want to come in closer.
Hoping to burn some film in them this weekend.
Shawn
OlivierAOP
medium format
How is the coverage of the 47mm at 6x12? Schneider claims 98/105mm circle at 5.6/22.
shawn
Mentor
Not sure yet, I believe those specs are for the older version. The MC version specs I found lists image circle of 123mm which is probably at f22. Haven't shot it on film but it does light up the ground glass to the sides of the film gate, even wide open. It is clearly vignetting doing that though and is probably not at all sharp like that wide open. A number of others have built 6x12 cameras with this lens, so hopefully it works out. If not I will build a lens 'cone' for it to mount on a Mamiya Press 6x9 back and shoot 6x9 or put 35mm in it for panoramic shots.
Shawn
Shawn
OlivierAOP
medium format
Oops my bad, image circle is 123mm at f/22 as you said (105 is the FOV in degrees). Good luck!
shawn
Mentor
Test roll done today on the Kraken 612 with the Schneider 47mm on a fixed focus lens cone. I screwed up the first frame as the focus tab was still open on the lens and it bled into the second frame a little too as it was exposed for so long.
This is at f5.6 wide open with the bleed obvious.

and this is at f11

this is at f16

Wide open the lens is very usable but it is obviously sharper as I stop down. Esp. in the distance. This fixed focus cone position feels like it is a good tradeoff.
Shawn
This is at f5.6 wide open with the bleed obvious.
and this is at f11
this is at f16
Wide open the lens is very usable but it is obviously sharper as I stop down. Esp. in the distance. This fixed focus cone position feels like it is a good tradeoff.
Shawn
Share:
-
This site uses cookies to help personalise content, tailor your experience and to keep you logged in if you register.
By continuing to use this site, you are consenting to our use of cookies.