
Chriscrawfordphoto
Real Men Shoot Film.
A few days ago, someone on RFF asked me how I tone the Black & White photos I post here, so I decided to wrote a tutorial on it!
Black and white prints are rarely made to have an absolutely neutral gray 'color.' B&W images actually look nicer with a slight color tone added to them! They tend to have a greater 'depth' to the image when toned.
The Traditional Way
Photographers who make black & white prints in the darkroom have always had the ability to control the 'color' of their prints through choice of paper type and the use of chemical toners.
Manufacturers of silver-based papers used in the darkroom made "Cold Tone" papers, which had a slightly cool color to the image; "Neutral Tone" papers that were close to neutral gray in color; and "Warm Tone" papers that had a warm brownish or olive image tone.
In addition, chemical toners could be used on the prints after they were developed and fixed to augment the image color built in to the paper. Selenium toner shifted the image slightly to a blue-purple hue (this was subtle, not a strong color change!), while Sepia and brown toners gave a warm brown image. The effect of these could be varied from a subtle change to a strong brown tone, depending on how long the paper was left in the toner.
Digital Printing
There are two ways to tone a digital/Inkjet B&W print.
One way is to add a color tone in Photoshop (as demonstrated below in the "Web Display" section on this tutorial), then print the image as if it were a color image. This method does not work well because most inkjet printer drivers have trouble printing toned B&W images in their color printing modes. Often, darker tones will go too dark and the color tone will not be consistent across the whole tonal range. The color might look different in the light tones than in the mid-tones and the midtones different than the dark tones.
The better way is to keep the image in Grayscale mode and print it using either the printer's dedicated B&W print mode (Epson's Advanced B&W Mode, for example) or using third-party printer drivers like Quadtone RIP. Both Quadtone RIP and Epson's Advanced B&W Mode have built in settings for Cool, Neutral, Warm, and Sepia tones. Epson's system also allows you to set your own color tone if you want something different than the built-in toning choices.
Epson's Advanced B&W Mode and QuadTone RIP both give beautiful B&W tonality and toning quality. I have tutorials for both systems that show you step-by-step how to make prints with them.
Epson Advanced B&W Tutorial (YouTube)
Quadtone RIP Tutorial
Web Display
If you show your work online, you'll need a toned version of the digital image so that people will see an online version that looks like the actual prints you make of the image. This can be done in Photoshop.
1: First, you should resize the image to the size you want to use for your website.
2: Convert the image from Grayscale to RGB color. You cannot add a color tone to a grayscale image. For the web, the image should be converted to the sRGB color space.
In Photoshop, go to the Edit menu, and choose Convert to Profile. You'll see this dialogue box pop up. Choose sRGB as the destination space.

3: There are several ways in Photoshop to tone a B&W image. The two ways I have found that work best are using the Color Balance settings (under Image/Adjust/Color Balance) and the Hue-Saturation settings (under Image/Adjust/Hue-Saturation). I use the Color Balance settings for Selenium Toning, and the Hue-Saturation settings for Warm and Sepia Toning. The example images below show the actual settings I use, though you can certainly experiment and see what works best for you. These are good starting points, but are not carved in stone!
Note that when you use the Hue-Saturation settings, you MUST check the Colorize checkbox, as shown in the examples below.
Examples

Untoned Image
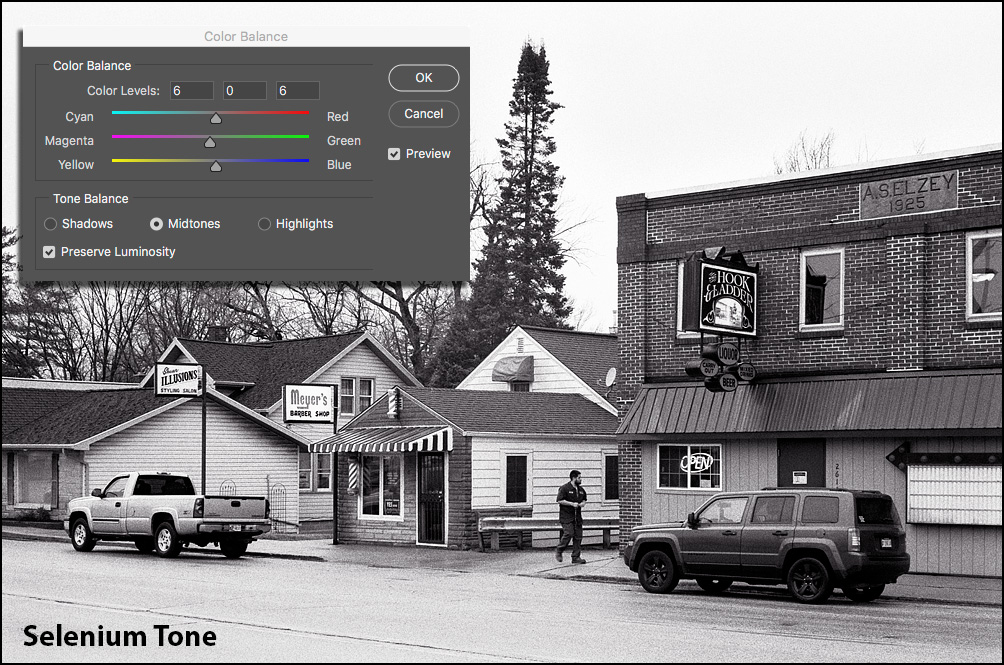
Selenium Toned image. I used the Color Balance settings in Photoshop. Choose "Midtones" and set the color levels to 6, 0, 6.

Warm Toned image. I used the Hue-Saturation settings in Photoshop. Check the "Colorize" box and set the Hue to 16, Saturation to 7, and Lightness to 0.

Sepia Toned image. I used the Hue-Saturation settings in Photoshop. Check the "Colorize" box and set the Hue to 15, Saturation to 19, and Lightness to 0.
Black and white prints are rarely made to have an absolutely neutral gray 'color.' B&W images actually look nicer with a slight color tone added to them! They tend to have a greater 'depth' to the image when toned.
The Traditional Way
Photographers who make black & white prints in the darkroom have always had the ability to control the 'color' of their prints through choice of paper type and the use of chemical toners.
Manufacturers of silver-based papers used in the darkroom made "Cold Tone" papers, which had a slightly cool color to the image; "Neutral Tone" papers that were close to neutral gray in color; and "Warm Tone" papers that had a warm brownish or olive image tone.
In addition, chemical toners could be used on the prints after they were developed and fixed to augment the image color built in to the paper. Selenium toner shifted the image slightly to a blue-purple hue (this was subtle, not a strong color change!), while Sepia and brown toners gave a warm brown image. The effect of these could be varied from a subtle change to a strong brown tone, depending on how long the paper was left in the toner.
Digital Printing
There are two ways to tone a digital/Inkjet B&W print.
One way is to add a color tone in Photoshop (as demonstrated below in the "Web Display" section on this tutorial), then print the image as if it were a color image. This method does not work well because most inkjet printer drivers have trouble printing toned B&W images in their color printing modes. Often, darker tones will go too dark and the color tone will not be consistent across the whole tonal range. The color might look different in the light tones than in the mid-tones and the midtones different than the dark tones.
The better way is to keep the image in Grayscale mode and print it using either the printer's dedicated B&W print mode (Epson's Advanced B&W Mode, for example) or using third-party printer drivers like Quadtone RIP. Both Quadtone RIP and Epson's Advanced B&W Mode have built in settings for Cool, Neutral, Warm, and Sepia tones. Epson's system also allows you to set your own color tone if you want something different than the built-in toning choices.
Epson's Advanced B&W Mode and QuadTone RIP both give beautiful B&W tonality and toning quality. I have tutorials for both systems that show you step-by-step how to make prints with them.
Epson Advanced B&W Tutorial (YouTube)
Quadtone RIP Tutorial
Web Display
If you show your work online, you'll need a toned version of the digital image so that people will see an online version that looks like the actual prints you make of the image. This can be done in Photoshop.
1: First, you should resize the image to the size you want to use for your website.
2: Convert the image from Grayscale to RGB color. You cannot add a color tone to a grayscale image. For the web, the image should be converted to the sRGB color space.
In Photoshop, go to the Edit menu, and choose Convert to Profile. You'll see this dialogue box pop up. Choose sRGB as the destination space.
3: There are several ways in Photoshop to tone a B&W image. The two ways I have found that work best are using the Color Balance settings (under Image/Adjust/Color Balance) and the Hue-Saturation settings (under Image/Adjust/Hue-Saturation). I use the Color Balance settings for Selenium Toning, and the Hue-Saturation settings for Warm and Sepia Toning. The example images below show the actual settings I use, though you can certainly experiment and see what works best for you. These are good starting points, but are not carved in stone!
Note that when you use the Hue-Saturation settings, you MUST check the Colorize checkbox, as shown in the examples below.
Examples
Untoned Image
Selenium Toned image. I used the Color Balance settings in Photoshop. Choose "Midtones" and set the color levels to 6, 0, 6.
Warm Toned image. I used the Hue-Saturation settings in Photoshop. Check the "Colorize" box and set the Hue to 16, Saturation to 7, and Lightness to 0.
Sepia Toned image. I used the Hue-Saturation settings in Photoshop. Check the "Colorize" box and set the Hue to 15, Saturation to 19, and Lightness to 0.
Tom R
Established
Thank you for posting this! I work with a lot of panchromatic (scanned) images, and I scan these per your recommendations in 16-bit greyscale. I had sort of discovered what you presented in this message by experimentation; thus, I find the examples as a kind of confirmation that this works.
The only "caveat" that I might offer (and you also discuss this in your post) concerns printing. I ran several tests, converting 16-bit greyscale images to sRGB and then using various presets (in Capture One) as well as manual color balances (in Affinity). I bundled these results up and created a simple book using the Blurb "BookWright" tool. Long story short, I soft proofed, sent the stuff off to Blurb and received an awful mess (happily, I only printed up about thirty images). Seems that no matter how "reasonable" the images appear in the Soft Proofing program (using Blurb's profile), the printers do unpredictable things.
Long story short: perhaps this means that those needing quality panchromatic reproduction for books have to ante-up and go with "real" book printers as opposed to "on demand" sites?
Anyway, thank you again: Enjoyed the post!
dourbalistar
Buy more film
A few days ago, someone on RFF asked me how I tone the Black & White photos I post here, so I decided to wrote a tutorial on it.
I was that certain someone who asked...
") Thank you for the write up, Chris! I was only expecting a yes/no response, so this goes way above and beyond!
Thank you for the write up, Chris! I was only expecting a yes/no response, so this goes way above and beyond!peterm1
Mentor
Thanks for that Chris, it is very useful to know that technique. Allow me to suggest another one for those so inclined.
If you use Nik plugins as an annexure to Photoshop or Lightroom, a good option for toning also exists in Silver Efex. You need to scroll down a little to the section headed "Finishing Adjustments". Immediately below that heading is a sub heading "Toning" and a drop down menu. This gives a selection of tonal colors. The default tone (labelled 1 in the drop down) is active and the setting has the "strength" slider at 0%. If you move the slider to the right you will notice both that slider and one below marked "Silver Hue" will move together and at some point the active image will take on a slightly brownish tone. If you keep sliding it will become sepia. Of course if you are after a different effect you can simply choose a different color from the drop down (eg cyanotype, selenium etc.) but I almost exclusively use the default color which has that brownish hue which becomes more intense as the slider is moved to the right
I like to use a small amount as I find that in many images an untoned BW image is too stark and harsh. A small mount of brown takes the edge off. At least that is my preference. It is extremely simple and flexible. I try never to over do it to the point where my photos become sepia but I do adjust the intensity of the effect using the slider based upon the needs of the specific image. Some get a little more, some get a little less. It depends how the image looks to my eye.
Some examples.
 Eye of the Wind - Solomon Islands by Life in Shadows, on Flickr
 Bookshop Owner by Life in Shadows, on Flickr
 Portrait of a Selfie in the Making by Life in Shadows, on Flickr
If you use Nik plugins as an annexure to Photoshop or Lightroom, a good option for toning also exists in Silver Efex. You need to scroll down a little to the section headed "Finishing Adjustments". Immediately below that heading is a sub heading "Toning" and a drop down menu. This gives a selection of tonal colors. The default tone (labelled 1 in the drop down) is active and the setting has the "strength" slider at 0%. If you move the slider to the right you will notice both that slider and one below marked "Silver Hue" will move together and at some point the active image will take on a slightly brownish tone. If you keep sliding it will become sepia. Of course if you are after a different effect you can simply choose a different color from the drop down (eg cyanotype, selenium etc.) but I almost exclusively use the default color which has that brownish hue which becomes more intense as the slider is moved to the right
I like to use a small amount as I find that in many images an untoned BW image is too stark and harsh. A small mount of brown takes the edge off. At least that is my preference. It is extremely simple and flexible. I try never to over do it to the point where my photos become sepia but I do adjust the intensity of the effect using the slider based upon the needs of the specific image. Some get a little more, some get a little less. It depends how the image looks to my eye.
Some examples.
Eye of the Wind - Solomon Islands by Life in Shadows, on FlickrBookshop Owner by Life in Shadows, on FlickrPortrait of a Selfie in the Making by Life in Shadows, on FlickrShac
Well-known
Many thanks Chris - gives me an alternate to using Duo- and Quad-tones in PS.
I agree with you that a slight colour tone really adds to a B&W image
I agree with you that a slight colour tone really adds to a B&W image
Evergreen States
Pierre Saget (they/them)
When I get around to printing again, I’d love to give duo-, tri- and quad tone a try. How would you recommend going about that? What color combinations do you recommend to bring out the tones in inkjet prints?
Corran
Well-known
A very good methodology for using Layers for non-destructive editing and the "Color Fill" layer, which can be edited to taste:
http://www.kennethleegallery.com/html/tech/Toning.php
I don't use this technique myself, but it's commonly cited on the LF forums (KL is a prominent member).
http://www.kennethleegallery.com/html/tech/Toning.php
I don't use this technique myself, but it's commonly cited on the LF forums (KL is a prominent member).
Chriscrawfordphoto
Real Men Shoot Film.
When I get around to printing again, I’d love to give duo-, tri- and quad tone a try. How would you recommend going about that? What color combinations do you recommend to bring out the tones in inkjet prints?
I don't recommend it. Duotone/TriTone/Quadtone printing is intended for printing presses using three separate printing plates, each with a different color ink. Inkjets cannot do that; the ink colors they use are the primary colors plus black. Real duo/tri/quad printing is done using slightly tinted gray inks.
If you set up an image in Photoshop using Photoshop's duo/tri/quad functions, the inkjet printer is actually given an RGB version, which it interprets the same way it does with any toned BW image and gives similarly poor results.
If you are looking for prints where the highlights and shadows are toned differently from each other, look into QuadTone RIP software; it has that functionality built in and serves as an alternative printer driver that overcomes the issues with printing an image you toned in Photoshop.
Evergreen States
Pierre Saget (they/them)
I don't recommend it. Duotone/TriTone/Quadtone printing is intended for printing presses using three separate printing plates, each with a different color ink. Inkjets cannot do that; the ink colors they use are the primary colors plus black. Real duo/tri/quad printing is done using slightly tinted gray inks.
If you set up an image in Photoshop using Photoshop's duo/tri/quad functions, the inkjet printer is actually given an RGB version, which it interprets the same way it does with any toned BW image and gives similarly poor results.
If you are looking for prints where the highlights and shadows are toned differently from each other, look into QuadTone RIP software; it has that functionality built in and serves as an alternative printer driver that overcomes the issues with printing an image you toned in Photoshop.
Thank you very much for clearing this up, Chris. After your reply I went and read your essay on Quadtone RIP on your web site.
Share:
-
This site uses cookies to help personalise content, tailor your experience and to keep you logged in if you register.
By continuing to use this site, you are consenting to our use of cookies.