Arnold Layne
Well-known
Hello.
I'm trying to get to the middle elements of my beloved Summaron (M3 version), wich sadly has developed too much haze. I know the best thing I could do is sending the lens to a repair person, but I can not afford that. I'm a very careful person, and have appropiate tools. I have opened other lenses and cameras always succesfully.
So I have tryed both front and rear sides of the lens, but failed. The first element in the front was easy. But I'm having troubles with the second group (picture below). Is it held in place just by pressure? It does not want to come out.

From behind, also no luck. There are three rings (like in the picture below), none of them wants to unscrew. As I'm not sure wich one is first, I'm not aplying too much force. I don't want to damage anything.

Thank you.
I'm trying to get to the middle elements of my beloved Summaron (M3 version), wich sadly has developed too much haze. I know the best thing I could do is sending the lens to a repair person, but I can not afford that. I'm a very careful person, and have appropiate tools. I have opened other lenses and cameras always succesfully.
So I have tryed both front and rear sides of the lens, but failed. The first element in the front was easy. But I'm having troubles with the second group (picture below). Is it held in place just by pressure? It does not want to come out.
From behind, also no luck. There are three rings (like in the picture below), none of them wants to unscrew. As I'm not sure wich one is first, I'm not aplying too much force. I don't want to damage anything.
Thank you.
brusby
Well-known
It's press fit (the lens and its surrounding mounting structure). I think Leica must use a special tool. It might come out with a suction cup. Mine did, but I have the LTM version.
To remove the entire optical assembly (on the LTM version) you would unscrew the middle of your 3 retaining rings in the rear and then unscrew the entire front silver assembly. Then it comes out the front. But I don't know if the front piece unscrews on your version.
Good luck.
To remove the entire optical assembly (on the LTM version) you would unscrew the middle of your 3 retaining rings in the rear and then unscrew the entire front silver assembly. Then it comes out the front. But I don't know if the front piece unscrews on your version.
Good luck.
Erik van Straten
Mentor
Try to get some oil onto the threads of the rings, so that it can sip downwards. Leave the lens a few days alone, then try to open them with a well fitting tool.
Read some books on repairing lenses and cameras, or look on internet how to do it. It is no rocket science, but you need some experience. Don't force anything.
You'll need small pieces of rubber to hold the small parts or to twist them open without damaging them. You'll need a set of fine precision screwdrivers and pointed pliers to be able to hold small parts firmly. It's not easy. The main thing is not to damage anything. You have to understand that if you break something, it usually can't be replaced. God bless you.
The optical parts are held in place by rings. These rings have notches that allow them to be loosened with pointed pliers.
Last edited:
TenEleven
Well-known
I have not worked on this particular lens, but the post-war Contax mount Biogon 35/2.8 has a similar press fit construction. The only advice I can give is that it's of utmost important to try and lift the element out as straight as humanly possible. (And also to try and re-insert it the same way.)
If the element tilts even slightly there is a good chance that it will become snagged. Then you have to try and re-seat it at the resting position/bottom and do the process over again. The same is also true for the re-insertion process. It's painful but doable as long as you go slow.
If the element tilts even slightly there is a good chance that it will become snagged. Then you have to try and re-seat it at the resting position/bottom and do the process over again. The same is also true for the re-insertion process. It's painful but doable as long as you go slow.
yossi
Well-known
@Arnold Layne,
This YT video would be helpful. Just use 0.25 playback speed and you would be able to see all the steps to disassemble and re-assemble all the lens elements/parts.
Best of luck,
Yossi
This YT video would be helpful. Just use 0.25 playback speed and you would be able to see all the steps to disassemble and re-assemble all the lens elements/parts.
Best of luck,
Yossi
Arnold Layne
Well-known
Thank you Bursby. Ok, knowing how it is held, I can think thee way to act. Looking at the video posted by @yossi It looks that the part that has to come out is the lens plus the circular black plate.:It's press fit (the lens and its surrounding mounting structure). I think Leica must use a special tool. It might come out with a suction cup. Mine did, but I have the LTM version.


Just to be sure, you mean No2 right?:To remove the entire optical assembly (on the LTM version) you would unscrew the middle of your 3 retaining rings in the rear and then unscrew the entire front silver assembly. Then it comes out the front.

Thank you Erik, I'll definetly try that. I have a good set of precission screwrivers, a lens spanner wrench with multiple heads and a bunch of rubber joints of all sizes to twist rings. As you say, I try to not force anything. The last thing I want is to ruin a 70 years old beautiful lens!Try to get some oil onto the threads of the rings, so that it can sip downwards. Leave the lens a few days alone, then try to open them with a well fitting tool.
Arnold Layne
Well-known
Thank you Yossi, I already saw that video. It is very useful, especially the front lens. But the back looks diferent It looks like this one:@Arnold Layne,
This YT video would be helpful. Just use 0.25 playback speed and you would be able to see all the steps to disassemble and re-assemble all the lens elements/parts.
Best of luck,
Yossi

This picture is from here, where it is a lot of great info.
Sadly, it looks like ther is little info on this particular lens (m3 version).
Thank you all, I'll try to work on it as soon as I can and will take photos.
brusby
Well-known
Thank you Bursby. Ok, knowing how it is held, I can think thee way to act. Looking at the video posted by @yossi It looks that the part that has to come out is the lens plus the circular black plate.:
View attachment 4837901
Yes, it's the same way on my LTM version. The glass lens with its surrounding black plate are all one single part that comes out together exactly as shown above.
Just to be sure, you mean No2 right?:
View attachment 4837900
Yes ring #2 needs to be removed on my LTM to release the optical block. But I think on your version you may have to take off #1 first. Maybe #2 as well. That should let you get the center core containing the optics out the front.
Ring #3 is removed when you want to separate the rear lens shown in the above photo from the rest of the optical block.
I wouldn't put oil on the threads because of the risk of it migrating to the optics. Instead I'd use lighter fluid. But just a few drops applied to the threads where the parts join. Those rear rings are usually on tight but not exceedingly so.
I always make sure to push inward with quite a bit of force when I turn so the spanner doesn't tend to jump out of the slots. But you've got to make sure it doesn't slip and hit the lenses.
jc031699
Established
I have a posting on this forum about the exact steps for doing this. It is for the LTM version though. On eBay Nobbysparrow sells a manual for how to overhaul several of the early Leica lenses. Not sure if the m-mount version Summaron is included.
peterm1
Mentor
Like yours, some years ago, mine (an early M mount one like yours I think) was exhibiting flare also due to haze in the middle elements (as is usual I think -due to outgassing from the helicoid lube) but rather than to try to rectify it myself I sent to it my local repairman (who also owns and runs a camera store in Adelaide, Australia) who soon sorted it out. He did not mention having any particular problems getting these elements out for cleaning BUT I do distinctly recall him saying that the coatings on these interior elements are particularly soft in these lenses and hence prone to damage if cleaned too enthusiastically (so be warned)! I think this is a common issue with Leica lenses of that era. In my case, he was apologetic as he felt this deterred him from cleaning too hard and hence, he felt he was not able to totally get rid of the haze. As it happened, he apparently got rid of enough of it as I have not really had a problem since.
I know this does not help much with your direct answer but it may be worth you knowing about the coatings issue.
I know this does not help much with your direct answer but it may be worth you knowing about the coatings issue.
yossi
Well-known
-- wrong msg deleted. --
Last edited:
yossi
Well-known
@Arnold Layne
I chance upon a post in a Chinese Forum, asking for help to open this Summaron 3.5 lens for haze cleaning. From what I could read, the outermost retaining ring is the first one (which you had marked in your photo in post #6 above as '1") that has to be removed. They were talking about using a special tool with enough strength to be used to unscrew it as the retaining ring was very tight.


I chance upon a post in a Chinese Forum, asking for help to open this Summaron 3.5 lens for haze cleaning. From what I could read, the outermost retaining ring is the first one (which you had marked in your photo in post #6 above as '1") that has to be removed. They were talking about using a special tool with enough strength to be used to unscrew it as the retaining ring was very tight.
Last edited:
Arnold Layne
Well-known
I could work a bit more in this. Still unsuccessful....:
1. I removed the tiny grub screw under the name plate. Unscrewed the front silver ring.
2. Removed the three screws to lift the aperture index ring.
3. The same with the two pins that holds the ring that operate the aperture. Careful with the two ball bearings.
And that's it. When I try to unscrew the rear retaining ring (wich requieres a lot of strength), the whole optical block rotate (dashed line). I'm stuck here.
Last edited:
Arnold Layne
Well-known
Thak you @yossi , this is very interesting. Do they give more details abut the way to acomplish that?@Arnold Layne
I chance upon a post in a Chinese Forum, asking for help to open this Summaron 3.5 lens for haze cleaning. From what I could read, the outermost retaining ring is the first one (which you had marked in your photo in post #6 above as '1") that has to be removed. They were talking about using a special tool with enough strength to be used to unscrew it as the retaining ring was very tight.
View attachment 4837948
View attachment 4837949
brusby
Well-known
You have to hold the front of the lens tightly to prevent it from rotating while turning the rear retaining ring with a spanner. It may take quite a bit of force. If you are not able to hold it with your hand, put a piece of sticky rubber on a table top and press the front mount into it to keep it from rotating.
This is ring #2 that we discussed in your previous post. It is the key to removing the optical block.
I would have tried to remove the rear retaining ring first, before removing all the front assembly because now you have less to hold onto to immobilize the front.
p.s., 'thought I should mention, just a few days ago I disassembled and cleaned my 35mm Summaron 3.5 LTM using this technique. So, I know it works. And the rear retaining ring on your version -- which is the key to removing the optical block -- looks the same as mine.
Last edited:
yossi
Well-known
Hi Arnold,Thak you @yossi , this is very interesting. Do they give more details abut the way to acomplish that?
The comment/suggestion on that post was sketchy. I append the original Chinese comment and its translation (from Google Translate and my limited proficiency of Chinese language) below for reference:
“需要做两个专用工具,一个是固定镜头前端的卡具;另一个是卸开最外缘那个压圈的工具。用网上卖的卡口工具不行。
前面的工具最好用软金属来做,铝和铜都行,就是一个空心的环形圆柱,要有一定的厚度和强度,从圆柱的高开一个通槽。内孔能套在镜头前端,因有槽可以施加外力夹紧镜头。 后面的工具就是在一个和镜头压圈一样直径的圆柱上钻两个和压圈一样孔,插入两根钢丝,钢丝露出的部分正好和压圈的孔相吻合,在旋转时,一边用力向下压一边旋转。"
"Two special tools need to be made, one is a clamp to fix the front end of the lens; the other is a tool to remove the outermost ring.
The tool (for the front ring) is best made of soft metal, either aluminum or copper. It is a hollow annular cylinder with a certain thickness and strength, and a slot is opened from the height of the cylinder. The inner hole can be placed on the front end of the lens, because there are grooves that can apply external force to clamp the lens. The tool (for the rear ring) is to drill two holes with the same diameter as the lens pressure ring on a cylinder with the same diameter as the lens pressure ring, insert two steel pins, the exposed part of the steel pins must fit/align with the hole of the pressure ring, while rotating, force downward, press and rotate."
I believe you need to unscrew the rear lens retaining ring first before you disassemble the front parts. From the above post, it seems two tools like the ones shown below could probably do the job:
1. A soft-metal clamp to hold the front ring tight:

2. A lens opener wrench, or something stronger (although the Chinese post said those available online won't work, not sure why?!)

peterm1
Mentor
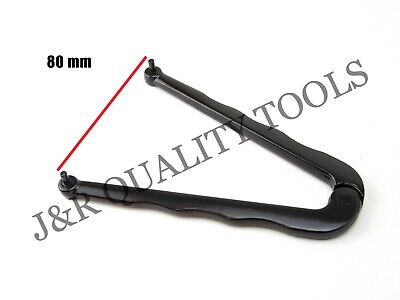
It occurred to me that you may need something which I believed is sometimes called a "pin wrench" or pin spanner" There are a couple depicted in the links below with various interchangeable "pins" (in the case of one) and adjustable spanner widths but I am not sure if this is suitable or not. I do have a simple version of one of these - it came with an angle grinder and is used to fit/remove cutting discs. It pretty much looks for all the world just like a normal spanner but with a pin protruding from each jaw. I was thinking that one of these could be made in a home workshop by someone with a few handyman skills. I would envisage that the pins could either be screw mounted into the "spanner" or silver soldered.
Here it the commercial one with interchangeable pins that I mentioned above.

And here is a cheaper, more simple version of the above. (Other similar devices are advertised in links off this page.) You would need to ascertian if they would work in terms of size and fit.
Here it the commercial one with interchangeable pins that I mentioned above.
Cylinder Spanner Wrench Set - 15Pc Pin Spanner Wrench and Variable Pins 1/2 inch | eBay
1 15Pc Adjustable Variable Pin Spanner Wrench Tool. The Adjustable Gland Nut Wrench Set is made from a durable steel material with manganese phosphate finish provides maximum strength and resistance to corrosion, suitable for your bike, motorcycle, scooter, or car;.
www.ebay.com
And here is a cheaper, more simple version of the above. (Other similar devices are advertised in links off this page.) You would need to ascertian if they would work in terms of size and fit.
VCT ADJUSTABLE FACE HAND STEEL PIN SPANNER WRENCH TOOL | eBay
Adjustable pin to pin distance: Min: 15mm, Max:80mm. High Quality steel.
www.ebay.com
brusby
Well-known
Here is a video of an experienced repair guy working on a 35mm f2.8 Summaron. He removes the rear retaining ring at 1:10 with a rubber tool. Either it wasn't on too hard (like mine) or he loosened it in advance of making the video. But at 23:00 you can see him replacing it with the correct technique of using a spanner in one hand and holding the front of the lens with his other hand. I would use this latter technique to loosen yours if it is on tight.
Immediately after removing the rear retaining ring he separates the optical block by pulling it out of the mount from the front, exactly like your lens and mine are assembled.
Plus most Leica lenses are constructed in a similar fashion and there are many other videos on his website of removing rear retaining rings on Leica lenses using this technique of holding the lens in his left hand and using the spanner in his other hand.
But I find it is very important to push the spanner into the retaining ring with about as much force as you use to turn it. That helps to keep the tool from slipping out of the grooves.
Last edited:
yossi
Well-known
Just wanna point out that the rear lens retaining design for a Summaron 35mm f3.5 version (L) is quite different from that of a Summaron 35mm f2.8 version (R pix below). The 2.8 version is very easy: unscrew the retaining ring and the whole lens assembly can be taken out from the front (I did that with mine a few times before). Not so for the 3.5 version. There are 3 rings at the rear. The design looks quite similar to the early ltm version of Summaron 3.5. (See pix below)
35mm Summaron 3.5 vs 35mm Summaron 2.8

ltm 35mm Summaron 3.5

I don't have an M3 version of Summaron 3.5 lens, but I have opened up the ltm version for haze cleaning before. For the ltm version, all it takes is to unscrew the middle retaining ring and then unscrew the inner most ring (which is part of the rear lens element.) After that, the next lens element would just drop out easily. While I believe the M3 version has similar design, I cannot be 100% sure.
35mm Summaron 3.5 vs 35mm Summaron 2.8
ltm 35mm Summaron 3.5
I don't have an M3 version of Summaron 3.5 lens, but I have opened up the ltm version for haze cleaning before. For the ltm version, all it takes is to unscrew the middle retaining ring and then unscrew the inner most ring (which is part of the rear lens element.) After that, the next lens element would just drop out easily. While I believe the M3 version has similar design, I cannot be 100% sure.
Arnold Layne
Well-known
Thank you all, I am very grateful for the help and advice.
A little update:
You were right, it is ring No2 the one that holds the block. Then, unscrew both front and rear elements and tap gently for the inner ones to clean them all and the diaphragm too. Beautiful:

Now I have problems screwing in back the rear element. It is soooo tight that I cant get it all the way in! It stops when there is still like 2mm to go.
I cleaned the thole block with isopropyl and revised the threads with a needle to check for possible obstuctions but i found nothing:

Should I smear it with a light touch of oil? Any advice on how to achieve this would be welcome.
A little update:
You were right, it is ring No2 the one that holds the block. Then, unscrew both front and rear elements and tap gently for the inner ones to clean them all and the diaphragm too. Beautiful:
Now I have problems screwing in back the rear element. It is soooo tight that I cant get it all the way in! It stops when there is still like 2mm to go.
I cleaned the thole block with isopropyl and revised the threads with a needle to check for possible obstuctions but i found nothing:
Should I smear it with a light touch of oil? Any advice on how to achieve this would be welcome.
Share:
-
This site uses cookies to help personalise content, tailor your experience and to keep you logged in if you register.
By continuing to use this site, you are consenting to our use of cookies.