
juno_lau
Established
in the CLA for fed 2 and zorki 4
they said the shutter have to be cocked and set at a certain speed
do i have to do it to the zorki 6s (or other FSU cameras)?
and why?
thanks
i will try to do this soon...
they said the shutter have to be cocked and set at a certain speed
do i have to do it to the zorki 6s (or other FSU cameras)?
and why?
thanks
i will try to do this soon...
TVphotog
Television Grunt
It depends on how far your CLA is going. If you are not removing the curtains then yes, set the shutter speed to something easy. This way you know where to set the shutter speed dial at when you reassemble the camera. If you are removing the curtains, then don't worry about it as you will have to retension the curtains. Then the shutter speed selected before the disassembly makes no difference. The biggest thing is to learn which speeds correspond to the slots in the shutter speed regulator.
wolves3012
Mentor
For a camera with slow speeds (like the Zorki 4) you need to reassemble it on one of the faster speeds (like 1/250 or faster) just so that you won't mess up the slow speed mechanism. Apart from that, it makes no difference what speed you set. If there are no slow speeds you can set it to any speed.juno_lau said:in the CLA for fed 2 and zorki 4
they said the shutter have to be cocked and set at a certain speed
do i have to do it to the zorki 6s (or other FSU cameras)?
and why?
thanks
i will try to do this soon...
On the FED 2 sticky the speeds are set so that you can use a TV/monitor to test them. This is very difficult to do on slower speeds (1/125 or slower) because the slit is too wide to be useful. If the top speeds are set properly, the slower speeds are likely to be correct also.
blacknoise
Established
Great guide ")
I'm currently working on putting new curtains on my Zenit 3m (which is very similar to this), ive glued in my new curtains in the same place as the old ones but I can't work out how the new ones should be positioned (ie. how the curtains should be rolled) and also how the gears should mesh (the restrictor gear on the inside of the shutter cover and the small one that fits into the bottom of the shutter release and drives the cocking mechanism). Any ideas?
Sorry if this is conisdered off topic, it is the rangefinder forum after all
TVphotog
Television Grunt
Hey, I haven't been online here in a couple of months, didn't even see the sticky on this. I know, I still owe a reassembly thread Right now I am a bit distracted from reassembling some other much more intensive stuff... I got this one I am sticking back together
And this one is almost complete

At any rate, to answer your question. When I put mine back together, I made sure that the metal lathes were touching and then wound the second curtain completely around the main drum. I put the shutters back in and then wound the extras around the 'take up' spools. The really tricky part is getting the recess in the main drum lined up with the pin above. It took me several tries to get it lined up right. It is also helpful if you leave the shutter out till near the very end. This way, you make sure that you have the shutter speed selector and the shutter drum lined up correctly. It is difficult to explain. I will try to see if in the next month or so I can get this part of the reassembly sequence up with some pics to better explain it.
Right now I am a bit distracted from reassembling some other much more intensive stuff... I got this one I am sticking back together
And this one is almost complete
At any rate, to answer your question. When I put mine back together, I made sure that the metal lathes were touching and then wound the second curtain completely around the main drum. I put the shutters back in and then wound the extras around the 'take up' spools. The really tricky part is getting the recess in the main drum lined up with the pin above. It took me several tries to get it lined up right. It is also helpful if you leave the shutter out till near the very end. This way, you make sure that you have the shutter speed selector and the shutter drum lined up correctly. It is difficult to explain. I will try to see if in the next month or so I can get this part of the reassembly sequence up with some pics to better explain it.
rxmd
May contain traces of nut
Still no reassembly sequence, not for the car either
Massimiliano
Member
This spring?
This spring?
Hi all,
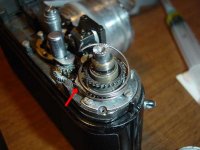
can someone please help me with the spring from the advance lever of the Z-6? I can't understand where the spring must be placed before the lever assembly is repositioned.
The "natural" position appears to me as posted in the photos, but... doesn't work!
Please excuse me for my strange english. Thanks!
Massimiliano
This spring?
Hi all,
can someone please help me with the spring from the advance lever of the Z-6? I can't understand where the spring must be placed before the lever assembly is repositioned.
The "natural" position appears to me as posted in the photos, but... doesn't work!
Please excuse me for my strange english. Thanks!
Massimiliano
Attachments
Last edited:
sig
Well-known
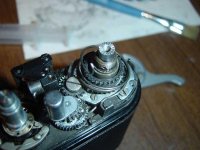
I am assuming the problem is that the spring slips out of its place?
Try to bend the end of the spring (bottom part), on the attached photo you can see where it is supposed to be, The bend will hold it in its place.
Be careful, I broke this spring on my Zorki 5.
Hope this helps
Try to bend the end of the spring (bottom part), on the attached photo you can see where it is supposed to be, The bend will hold it in its place.
Be careful, I broke this spring on my Zorki 5.
Hope this helps
Massimiliano
Member
Thank you, sig.
The spring is not locked at the base, and slips between the gears when it's rotated and stetched: under the big gear directly connected to the lever and in other (wrong) places.
Another Zorki 6 i've dismantled has another type of spring, much more easy to insert.
Thanks again
Massimiliano
The spring is not locked at the base, and slips between the gears when it's rotated and stetched: under the big gear directly connected to the lever and in other (wrong) places.
Another Zorki 6 i've dismantled has another type of spring, much more easy to insert.
Thanks again
Massimiliano
Rikkirutter
Member
Advance Lever advice - don't unscrew
Advance Lever advice - don't unscrew
I didn't get as far as removing the spring from the body having stopped at picture 10, but I did have difficulty reassembling the advance lever section - the only fiddly bit I found. At picture 4 you say to unscrew the three screws holding the advance lever but I would suggest not to.
Rikkirutter
Member
Reassembly of advance lever.
Reassembly of advance lever.
The 3 screws hold the top part of the advance lever to the lower section (with the arm). Under this lower section is a small ratchet and a hair spring. The ratchet has a grove down it's back and the hair spring must be located in this groove before the top section is inserted back through. The three screws you undid (picture 4) hold these 2 pieces together - if you don't unscrew them this assembly should still come away from the shaft by simply releaseing the main spring which is hooked through a (double) hole in this assembly.
Reassembly: If you have seperated the 2 parts of the advance lever carefully set the hair spring into the groove on the ratchet, and with this held in place slide the top section's collar down through the lever's central hole. Screw together. There are 5 holes - three for the screws, one for the spring to lock into, and a 5th that allows the ratchet to be held back whilst returning the lever to the body. The collar needs to slide inside the double cog. then use long nose pliers to grasp the end of the spring and pull it round (about half a turn on mine) till the hook on the end of the spring locks back into its hole. Using a small screwdriver through the 5th hole gentle settle the assembly bcak down onto the shaft.
David Murphy
Mentor
I want that cat!
newspaperguy
Well-known
Right on, David.
That was my reaction, too.
That was my reaction, too.
Massimiliano
Member
Yes, the advance lever assembly is a strange thing, but i don't have any trouble with that part. My only problem is to understand how the big helical spring under the assembly must be positioned/locked without interfere with all the gears etc.
(My cat refuse to help me! "ZORKI?? Where's my M6?")
Thanks again for the patience
(My cat refuse to help me! "ZORKI?? Where's my M6?")
Thanks again for the patience
Attachments

Last edited:
Massimiliano
Member
Ok, now I understand: the lever assembly is bent :bang:. Slightly, but nastily. When i move the lever, the helical spring is stretched incorrectly and can escape from his seat.
Well... I need a new lever.
Thanks!
Well... I need a new lever
.Thanks!
Steve M.
Mentor
This is one of the clearest DIY Zorki CLA's I've ever seen. Thanks! The cat is cool too. Almost makes me want to go out and buy a Zorki. Almost. But what stops me is that every FSU camera I've had, even ones that I sent out for CLA's, had shutter drag or capping. Some really bad, some on just some of the frames, but every one had it. Even after their repairs. Maybe you know something the repair guys don't? Or maybe it's the calming presence of your helper.
sig
Well-known
When I broke this spring on my zorki 5 I ended up with bending the end of the spring that broke (close to 90 degrees), and super gluing it to a hole in the body (I believe there used to be a screw there). Since the spring was shorter than it was supposed to be I used 1 of the 3 screw holes in the lever for the spring and put the screw in the former spring hole.....
TVphotog
Television Grunt
Hey Guys, sorry I have been so lax in checking this forum lately. The cat is not going anywhere! Well, if you can afford the food bill, I am sure the wife might be convinced to let him go... He is about twice the size now that he is in the photographs!!! He is still just as 'helpful' though he tends to take up the entire workspace I have not taken the zorki 6 apart in ages. I actually feel lucky in that none of my FSU have needed any work of late. Of course, I have just jinxed myself and now all my FSUs will crash I will play with the Z6 tonight and post some pics of the spring. I do have to say that your spring in question looks nothing like any of the springs I have found in my Z6s. Yours looks more like some enterprising camera repair guy made one with whatever he had available.
I want to say that when I put it back together, I set the spring in its catch on the gear and then threaded the advance lever on. I then used the advance lever to wind the spring to the correct tension. Once that was set, I then screwed the lever onto the camera. This was the easiest way to do it. It is nearly impossible to wind the spring and hold the tension while setting the advance lever onto the body. I will get some pics up tonight to show how I put it back together. I will even show the cat!
I have not taken the zorki 6 apart in ages. I actually feel lucky in that none of my FSU have needed any work of late. Of course, I have just jinxed myself and now all my FSUs will crash I will play with the Z6 tonight and post some pics of the spring. I do have to say that your spring in question looks nothing like any of the springs I have found in my Z6s. Yours looks more like some enterprising camera repair guy made one with whatever he had available.I want to say that when I put it back together, I set the spring in its catch on the gear and then threaded the advance lever on. I then used the advance lever to wind the spring to the correct tension. Once that was set, I then screwed the lever onto the camera. This was the easiest way to do it. It is nearly impossible to wind the spring and hold the tension while setting the advance lever onto the body. I will get some pics up tonight to show how I put it back together. I will even show the cat!
Share:
-
This site uses cookies to help personalise content, tailor your experience and to keep you logged in if you register.
By continuing to use this site, you are consenting to our use of cookies.