
Dralowid
Michael
(I have put this post in this section and not repairs etc because it follows on from others)
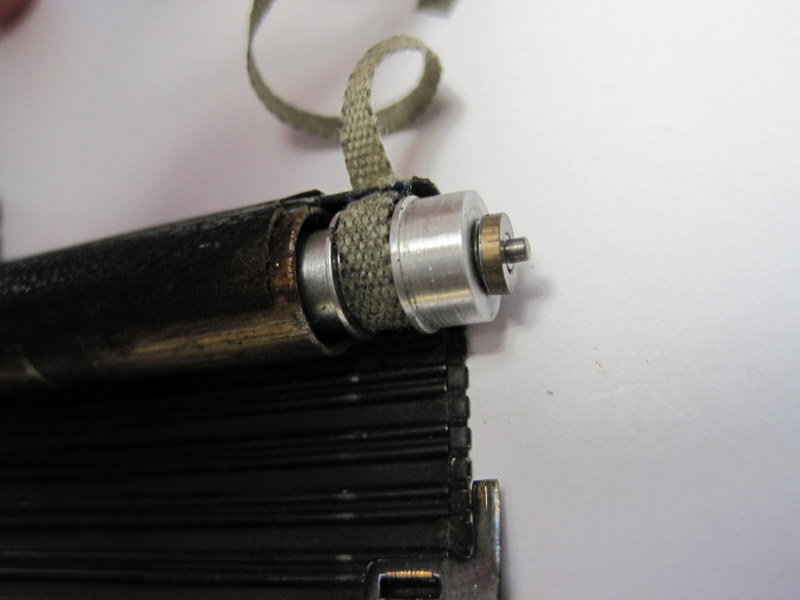
OK, so using Erik's excellent instructions I have arrived at the following point without incident or loss. You'll notice that I put screws back in their holes so that I know where they should go on re-assembly.
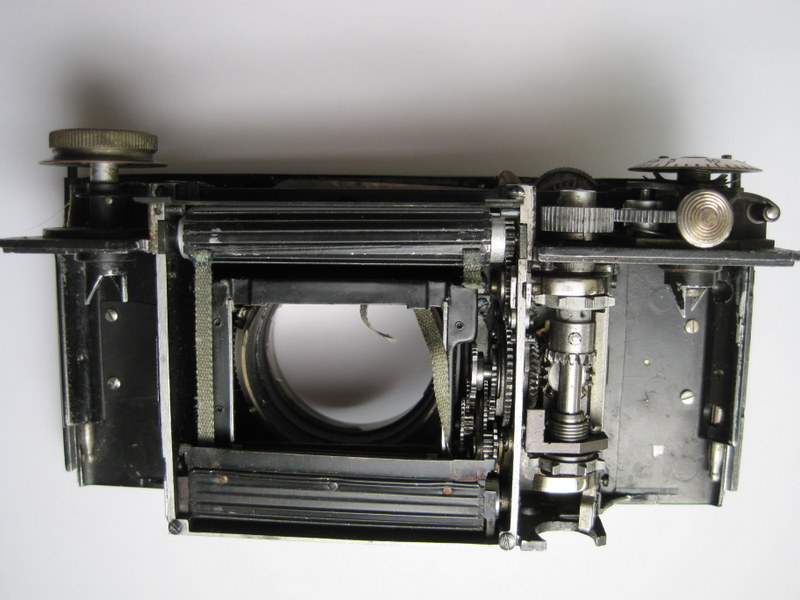 IMG_2790 by dralowid, on Flickr
I don't know if these are original ribbons but the rest of the camera's insides look as if they have suffered from the attentions of others. The camera was working before the ribbon broke.
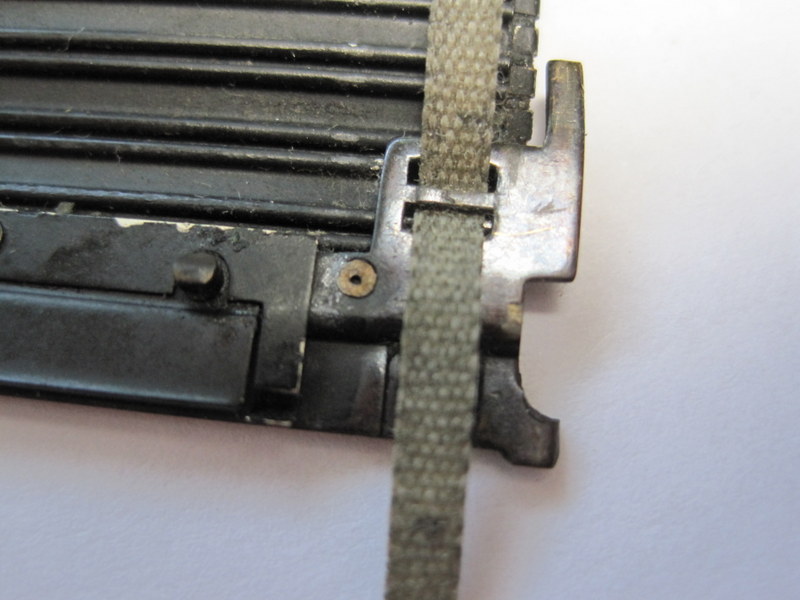
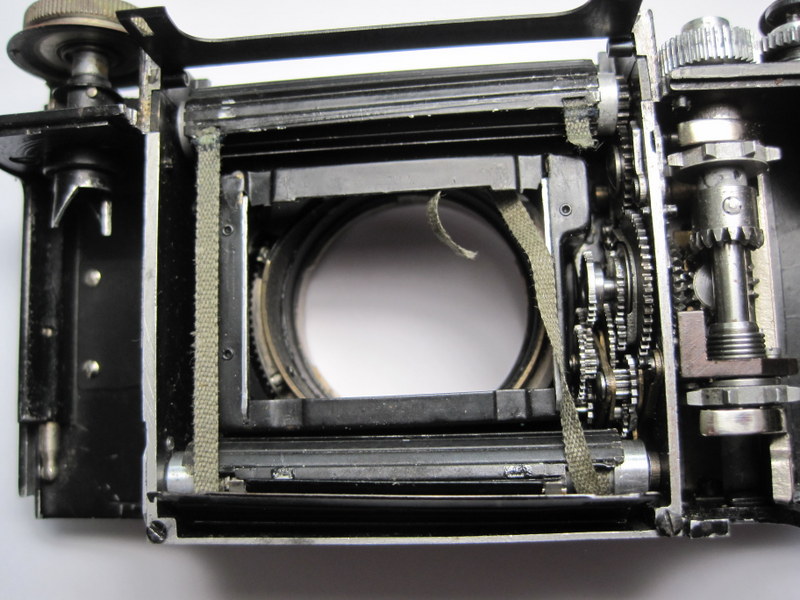 IMG_2792 by dralowid, on Flickr
To be honest I have read so many different threads on ribbons that I have become quite confused.
Ribbon I can order easily enough from Akai Ashi (apols if incorrect spelling).
According to my micrometer the old is +/- 3mm wide and .2mm thick. Will check their website
Then it becomes a question of approach. Do I remove the rollers etc which I would assume would make stitching easier or will this cause trouble later. Somewhere I have seen a picture of a simple jig for holding the whole thing in place while stitching. If it is necessary to remove the rollers how is it done?
If I keep the rollers in place I assume I need to record the tension and then cut the last remaining ribbon?
I'd like to take this one step at a time and I am in no rush. So long as I do not make the camera unrepairable by someone else (who?!) there is nothing to be lost.
Michael
OK, so using Erik's excellent instructions I have arrived at the following point without incident or loss. You'll notice that I put screws back in their holes so that I know where they should go on re-assembly.
IMG_2790 by dralowid, on FlickrI don't know if these are original ribbons but the rest of the camera's insides look as if they have suffered from the attentions of others. The camera was working before the ribbon broke.
IMG_2792 by dralowid, on FlickrTo be honest I have read so many different threads on ribbons that I have become quite confused.
Ribbon I can order easily enough from Akai Ashi (apols if incorrect spelling).
According to my micrometer the old is +/- 3mm wide and .2mm thick. Will check their website
Then it becomes a question of approach. Do I remove the rollers etc which I would assume would make stitching easier or will this cause trouble later. Somewhere I have seen a picture of a simple jig for holding the whole thing in place while stitching. If it is necessary to remove the rollers how is it done?
If I keep the rollers in place I assume I need to record the tension and then cut the last remaining ribbon?
I'd like to take this one step at a time and I am in no rush. So long as I do not make the camera unrepairable by someone else (who?!) there is nothing to be lost.
Michael
Hi Michael,
The ribbons look like the ones I have replaced in 2 x Contax II models. Same colour, weave looks about right and both mine (which I'm fairly sure were original) were stitched in place with blue thread. Others know better than me regarding working on Contaxes but I suspect they are likely to be original fitment. Despite the fact they are not as thick as original Zeiss material, most people seem to think the Aki Asahi ribbon material is the best alternative. I've used it both times and it's holding up OK so far and one camera is over 1000 cycles at various speeds by now with zero issues.
How far you go removing the mechanism is up to you. You can install ribbons with the rollers in situ but it's likely to be a lot easier if you release the spring tension first. Ideally you'd want to count the number of turns on the adjuster until it's fully unwound, so that you can use the same setting as a starting point on re-assembly. Sometimes easier said than done, though, the adjuster (On the II, anyway) isn't so easy to get a screwdriver head onto cleanly and it's not hard for the driver to slip off the head as you're adjusting the tension. Maybe the original Contax is easier in this respect? Not having worked on one I can't say but I'm sure the usual suspects can add to what I've mentioned and correct it if necessary.
Good luck with the repair and keep us posted please.
Cheers,
Brett
Erik van Straten
Mentor
Good work, Michael!
There's nothing to lose. Renewing the ribbons in a Contax is standard.
Removing the top cover.
1. Remove the film stabilizers in the film room. As a result, the screws of the housing of the shutter are accessible.
2. Remove the housing of the shutter from the film chamber.
3. Unscrew and remove the release button of the image counter with a piece of rubber (rear cover, near arrow).
4. Remove the rewind button. (one screw)
5. Remove the frame counter. (one screw)
6. Remove the small nickel screws from the top of the front plate (on the versions 6 and 7 also the ones of the receiving fork of the viewfinder slider.)
7. Remove the two large screws on the corners of the top cover, which can be accessed from the film room. (Inside the camera)
8. Remove the two large screws at the corners of the front side of the top plate under the leather. (Outside of the camera)
You now can remove the camera's top cover.
To get access to the shutter, remove the four screws of the cover plate of the shutter.
Installing new ribbons.
The biggest problem is the fact that the original ribbons are no longer available. One has to rely on alternatives. I've had good results with the ribbons from Aki Asahi, but actually these are too thin, so 1/500 and 1/1000 do not work anymore. The gap then closes to easy. Other speeds work fine.
Alternatively, there are the ribbons from Arsenal (Kiev). Which are thicker, more narrow and stiffer. I intend to use those when my v4 dies. I have no experience with these.
For the attachment of the ribbons there are two ways: first attach to the second curtain (Oleson method) or first attach to the first curtain (Van Straten method).
My method is as follows.
1. Let the ribbon that still is intact stay where it is. It serves as a model for the ribbon that you are replacing.
2. Set the shutter to "B" or "Z".
3. Remove the lower roller (in which the shutter spring is). In the left film chamber, seen from behind, is an aluminium hatch mounted with two small screws. Make these screws carefully loose, but not quite, so that the cover does not spring away because of the spring tension. Rotate with the schrewdriver the end of the spring (in the middle of the aliminium hatch) counter-clockwise until the spring is totally relaxed. Now, take off the hatch. Then the roller can be taken out of the camera. Beware the little rings at both ends of the roller but also the small metal pin that looks like a part of a needle. These components are all very important.
3. Remove the remains of the broken ribbon.
4. Attach a long piece of the new ribbon (at least 15 cm) to the roller in the same manner as the ribbon which is still good if the camera still has a good one. Work the ribbon through the openings while pushing it with a needle. The "caps" can be removed - by taking out the small screws - for easier inserting the ribbons (thank you Highway 61 for this tip). Use a fine needle and thread for the stitching. Lubricate the stitching with glue. Before the ribbon passes through the clutch on the other end of the curtain, the ribbon must be rotated a number of times around the roller in order to build up some tension. Use clothespins to keep everything together. Be inventive. When the ribbon is through the clutch its tension is fixed.
4. Attach the ribbon to the second curtain. This curtain stays in the camera. For the correct length of the ribbon compare with the old one.
5. Replacement of the spring-loaded roller. First replace at both ends the small rings, then put its end with the thick ring in its small hole on the right and then put on the left (the side of the aluminum hatch) the small metal rod in its slit. Replace the aluminum hatch, but do not fully tighten the screws yet. First give the spring some tension with a screwdriver (clockwise). Then tighten the small screws to fix the tension. The small metal pin is hold by the slot in the back of the aluminium hatch. The spring has enough tension when "B" or "Z" is working correctly. If you cannot get the speed selector to "B" or "Z" the ribbon is too short.
6. Have fun.
Erik.
Dralowid
Michael
Thanks both,
Ah well, the second ribbon broke just as I was facing up to removing the lower roller (I shouldn't fiddle but really had no strength). I guess it doesn't make too much difference so long as I can get a good measurement off the remains. I may need reminding how it goes through the buckles on the lower blind. I will remove lower roller later and also order ribbon. This is more fun than a Leica...
(Brett, off topic, I had hoped to buy a Trojan but chose the Austin because life is too short. There are few cars with the level of mechanical ingenuity (or single mindedness) as a Trojan Utility...)
Dralowid
Michael
Quick update...
Aluminium tensioning plate in place:
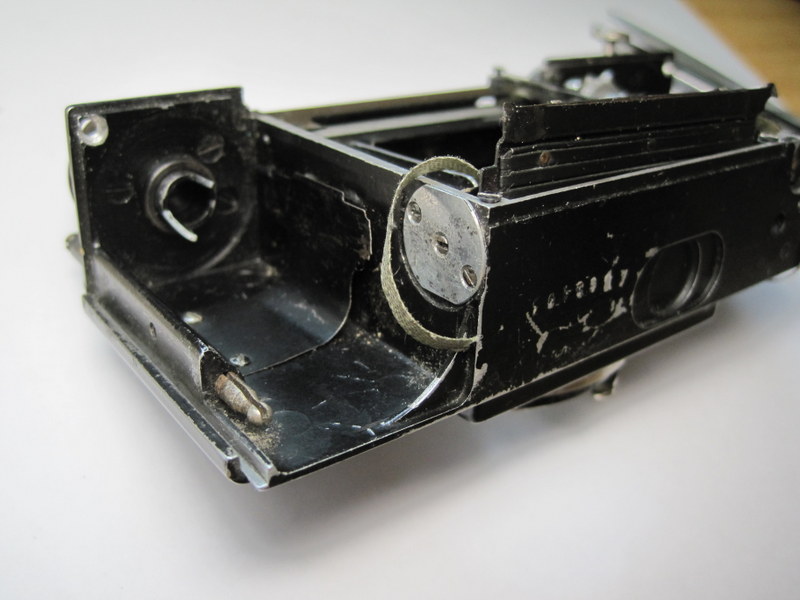 IMG_2793 by dralowid, on Flickr
Removed:
 IMG_2794 by dralowid, on Flickr
There appeared to be little more than 1.5 turns of tension withn the blind right down, much less than I thought.
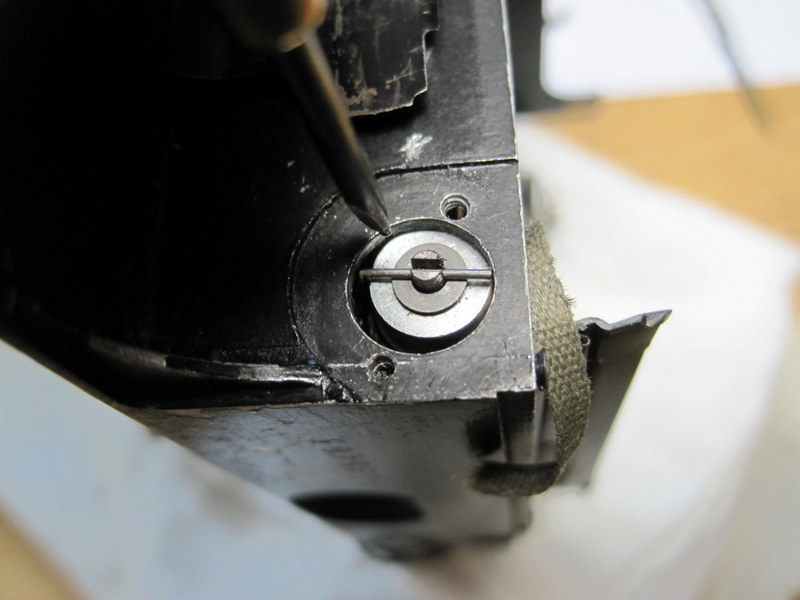
The pin etc
 IMG_2799 by dralowid, on Flickr
...and the other end.
 IMG_2796 by dralowid, on Flickr
I have been to the opticians for new glasses and ordered the tape. Now I wait. I was going to ask if there was anything else that I should be doing whilst the camera is open but decided best left...for now!
Aluminium tensioning plate in place:
IMG_2793 by dralowid, on FlickrRemoved:
IMG_2794 by dralowid, on FlickrThere appeared to be little more than 1.5 turns of tension withn the blind right down, much less than I thought.
The pin etc
IMG_2799 by dralowid, on Flickr...and the other end.
IMG_2796 by dralowid, on FlickrI have been to the opticians for new glasses and ordered the tape. Now I wait. I was going to ask if there was anything else that I should be doing whilst the camera is open but decided best left...for now!
Erik van Straten
Mentor
So far so good.
It is best to work with a binocular loupe that fits on your head, like the nightviewer from "The silence of the lambs". I have been using a Zeiss (East German) for many years. A great instrument for any photographer.
It is good to study how the ribbon goes through the clutch. There it goes wrong easily. The only other thing you can do is to wait for the ribbon, but Aki Asahi is usually superfast.
The number of turns of the spring will be different with other ribbons. It is my experience that there is enough tension when "B" or "Z" is working. More tension gives problems with the high speeds. The shutter then closes ("caps") too early so the film will be only partly exposed.
Erik.
Dralowid
Michael
Erik van Straten
Mentor
This is how it must be, from Henry Scherers website

I think you've got it right.
Erik.
I think you've got it right.
Erik.
Dralowid
Michael
Now that gives me an idea....
Dralowid
Michael
Interesting, the Contax I shutter ribbons are significantly shorter than those of the later cameras. Rick Oleson notes 4 3/8ths between folds and it looks like mine are around about 3 7/8ths. I'll stick to the size of what was in the camera.
He (or someone else) also mentions around 15 turns of tension in the bottom roller and I 'think' I only counted 4-5...
But I reckon both relate to Contax II or III
This is a picture is of my 'jig' for working on the ribbons, not up to Henry Scherer's standards but it does allow the whole thing to lie flat.
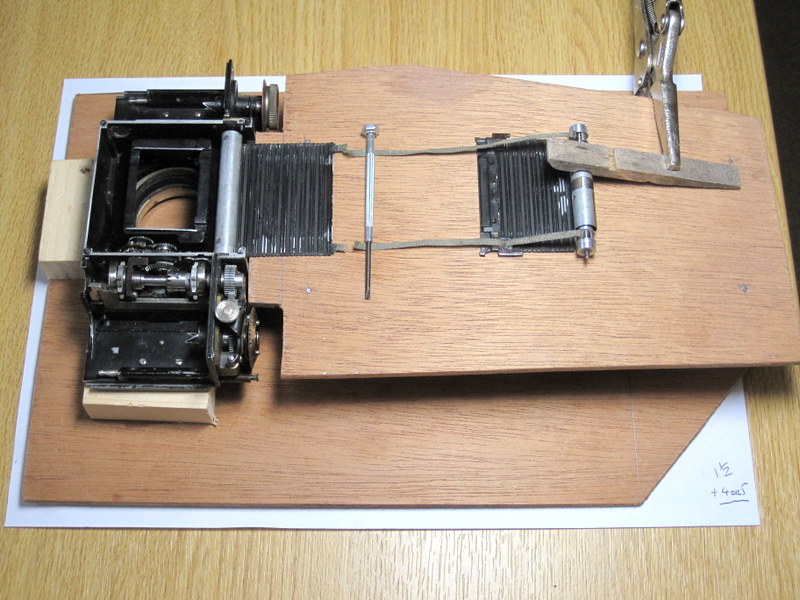 IMG_2802 by dralowid, on Flickr
He (or someone else) also mentions around 15 turns of tension in the bottom roller and I 'think' I only counted 4-5...
But I reckon both relate to Contax II or III
This is a picture is of my 'jig' for working on the ribbons, not up to Henry Scherer's standards but it does allow the whole thing to lie flat.
IMG_2802 by dralowid, on Flickr
Last edited:
Erik van Straten
Mentor
Interesting! But don't forget that the ribbon goes under the spring-loaded rollers on the right first, alongside the curtain.
Erik.
Erik.
Dralowid
Michael
Erik,
I was just stretching it out to get the measurements.
I think I understand you but to be quite clear do you mean that the ribbon must go round the spring loaded rollers two or three times (with no tension) before it goes up and through the sliding 'buckles' on the lower curtain?
Thanks so much for your help so far!
Michael
Erik van Straten
Mentor
do you mean that the ribbon must go round the spring loaded rollers two or three times (with no tension) before it goes up and through the sliding 'buckles' on the lower curtain?
Yes, they stay close to the curtain. They have tension from the springs in the two small spring loaded rollers. So the roller at the bottom has three separate springs, one for the curtain and two for the ribbons. In this way the two curtains have their own separate tension, one directly and the other via the ribbons.
The curtains in a Leica have separate springs too.
Erik.
Dralowid
Michael
Thanks, I will do things step by step when the ribbon arrives and seek your OK as I go!
Hatchetman
Well-known
Boy if someone ever mastered fixing these old Contax's it would make a great part time job in retirement! There are plenty of them out there but nobody can fix them!
Grytpype
Well-known
Is this what you mean, Michael?I think I understand you but to be quite clear do you mean that the ribbon must go round the spring loaded rollers two or three times (with no tension) before it goes up and through the sliding 'buckles' on the lower curtain?
l

The above is a Contax II, and I don't have a Contax I, but every Contax II/III or Kiev I have stripped since I started noticing, has had approximately two turns of 'wrap' of the ribbon round its roller with the first curtain fully extended, and the ribbon slack.
Whether this is right or wrong, I cannot say, but I've always reassembled them this way.
Erik van Straten
Mentor
I think I understand you but to be quite clear do you mean that the ribbon must go round the spring loaded rollers two or three times (with no tension) before it goes up and through the sliding 'buckles' on the lower curtain?
Before any confusion rises: It is required that the ribbons are first connected to the spring loaded rollers, but before they go through the "sliding buckles" they must be wound several times around the rollers. In that way they built up their tension. Once they are through the buckles their tension is fixed. Then you cannot change it anymore. They must get in this way as much tension as possible.
Erik.
Erik van Straten
Mentor
Is this what you mean, Michael?

The above is a Contax II,
On this picture I do not see the small spring loaded rollers for the ribbons.
Erik.
Grytpype
Well-known
The ribbons in my picture are wrapped round the rollers, but the end-caps are removed. The spring spindle in the II/III looks exactly like the Contax I spindle in Michael's picture above, but the method of locking the axle when you tension it is different.
How many turns would you estimate that you wrap the ribbons round the rollers before running through the friction clutches, Erik? As I said, in my rather limited experience there normally seem to be a couple of turns in the later Contax and Kiev, but this still means that there will be perhaps 1½ or 2 turns more tension on the 1st curtain spring than the 2nd curtain springs when the shutter is closed. Of course the 2nd curtain springs do have to extend much further than the 1st when you go to the slow speeds and B.
Steve.
Erik van Straten
Mentor
How many turns would you estimate that you wrap the ribbons round the rollers before running through the friction clutches,
It seems that the ribbons in a Contax I are shorter than in a Contax II. When they are cut to their final length (so that the camera can be set at "B") they must be completely wound on the rollers before they go into the clutches. In that case they have their maximum tension. That is how I see it. I don't know how many turns that is.
Erik.
Share:
-
This site uses cookies to help personalise content, tailor your experience and to keep you logged in if you register.
By continuing to use this site, you are consenting to our use of cookies.