
literiter
Well-known
optikhit,
I have this camera with the Prontor shutter. To remove the front element of my lens, I merely gripped it with my hand and turned counter clockwise to remove. It was quite stiff, but off it came. (This was only the lens of course. The shutter remained on the camera.)
Vincent
I have this camera with the Prontor shutter. To remove the front element of my lens, I merely gripped it with my hand and turned counter clockwise to remove. It was quite stiff, but off it came. (This was only the lens of course. The shutter remained on the camera.)
Vincent
Last edited:
FallisPhoto
Mentor
The shutter is the Synchro Compur.
Perhaps it is not necessary to fully service the shutter, just do a lubrication may be enough. BUT, how to remove the front lens elements? In the front there are no screws...
It just unscrews. From there, the retaining ring (and locking screw, on a larger shutter) are visible and accessable. Once this is removed, the facia, shutter speed ring and shutter speed cam just lift out. If you have not done this before, I'd suggest that you stop there. Before lifting the shutter speed cam out, note which pins engage the slots in the cam, because you will have to put them back in the slots upon reassembly.
Anyway, once you have the shutter speed cam out, you can take a small artist's brush and some naptha and scrub out the old sticky gunk and flush it all away with some fresh naptha.
optikhit
Photo gear player
Too bad you didn't wait, I was planning on putting mine up on ebay. It is totally functional.
Ohhh...What a pity. I have seen a Certo Six from Australia in these days. Is that yours?
optikhit,
I have this camera with the Prontor shutter. To remove the front element of my lens, I merely gripped it with my hand and turned counter clockwise to remove. It was quite stiff, but off it came. (This was only the lens of course. The shutter remained on the camera.)
Vincent
Thanks Vincent. It is so simple but it was a trick for me. I am preparing the beamsplitter, after that I will do it. Hoping the technician can do it well.
It just unscrews. From there, the retaining ring (and locking screw, on a larger shutter) are visible and accessable. Once this is removed, the facia, shutter speed ring and shutter speed cam just lift out. If you have not done this before, I'd suggest that you stop there. Before lifting the shutter speed cam out, note which pins engage the slots in the cam, because you will have to put them back in the slots upon reassembly.
Anyway, once you have the shutter speed cam out, you can take a small artist's brush and some naptha and scrub out the old sticky gunk and flush it all away with some fresh naptha.
Thanks Fallis.
optikhit
Photo gear player
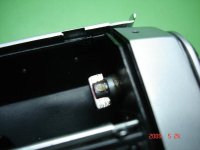
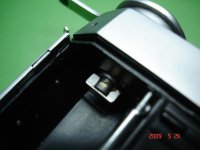
Open this thread again. My technician found difficult to remove the cover because on the winder side there is a dead rivet instead of a screw in the inner end. I think this is due to different model of Certo 6. Any idea?
The beamsplitter is ready. Coated in the Lab with chromium. Still have no time for the CLA.
The beamsplitter is ready. Coated in the Lab with chromium. Still have no time for the CLA.
literiter
Well-known
Can you send pictures? Show the rivets etc.
optikhit
Photo gear player
Can you send pictures? Show the rivets etc.
I will post the photo later. The camera now is with the technician.
i echo literiter, a picture would be great...in some cases there are some micro nut and bolts that work fine in place of a rivert, or if no tolerance is available then i rivet must be used...
i would like to hear more about your re-silvering the mirror/chromium experiance, cost, difficulty in finding them, to ehsat degree they 'half' silvered the mirror, and whether they would do it for all us ol rangefinder nuts...i gues you dont know just how well the light ratio is yet...kudos, you sound like a never quite type guy!
The glass is not silvered but coated with chromium in the lab. the thickness of glass is 2mm. In optics, it is easy to design the coating for a beamsplitter, and also the multilayer coating for enhancement of transmission.
The light ratio may be not exactly 50:50, no lab test for it. Not done myself but by a friend. We did have a coating machine but it stopped working for many years.
optikhit
Photo gear player
Can you send pictures? Show the rivets etc.
Hi freinds. Sorry for that long time. Here we have the photos at last. My Certo Six seems different from others, please see the pictures below. The inner holder has a dead end rivet without any screws. And also the upper part is clean without any thread to remove the winder. Any idea?
Attachments
Last edited:
optikhit
Photo gear player
FallisPhoto
Mentor
Hi freinds. Sorry for that long time. Here we have the photos at last. My Certo Six seems different from others, please see the pictures below. The inner holder has a dead end rivet without any screws. And also the upper part is clean without any thread to remove the winder. Any idea?
It is a C6 camera! That thing looks home-made. Are you sure that is a rivet or could it be a pin? I doubt it is a rivet, since I can't see how he would flatten it. You can probably just drive it through with a drift punch from one end or the other.
RichC
Well-known
Optikat - that pin should be a grub screw (i.e. a screw that's all thread and has no head). I suspect that the thread was stripped by someone, and has been bodged by pressing in a pin!
If that pin can't be pressed out, it will have to be drilled out. I'd tap a new thread so you can use a slightly larger grub screw than was originally fitted.
The winder and its shaft can then simply be pulled out, allowing the top plate to be removed.
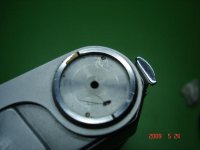
One of two different discs was glued onto the top of the winder - the first type is a depth of field scale; the second, later, type is a film speed indicator goes up to only 200 ASA!). Neither is especially useful, so I'd just stick a piece of leather there. Or you might be able to find a film speed indicator off another camera that could fit (it's always handy to know what film you put in your camera!)
If that pin can't be pressed out, it will have to be drilled out. I'd tap a new thread so you can use a slightly larger grub screw than was originally fitted.
The winder and its shaft can then simply be pulled out, allowing the top plate to be removed.
One of two different discs was glued onto the top of the winder - the first type is a depth of field scale; the second, later, type is a film speed indicator goes up to only 200 ASA!). Neither is especially useful, so I'd just stick a piece of leather there. Or you might be able to find a film speed indicator off another camera that could fit (it's always handy to know what film you put in your camera!)
Last edited:
FallisPhoto
Mentor
Optikat - that pin should be a grub screw (i.e. a screw that's all thread and has no head). I suspect that the thread was stripped by someone, and has been bodged by pressing in a pin!
If that pin can't be pressed out, it will have to be drilled out. I'd tap a new thread so you can use a slightly larger grub screw than was originally fitted.
What's worrying me is that the thing has the appearance of grinding. I'm hoping that isn't a brass bolt with both ends ground off!
Last edited:
optikhit
Photo gear player
Thank you, my friends. It seems no other good method to remove the winder. We will then use the drill....
FallisPhoto
Mentor
One of two different discs was glued onto the top of the winder - the first type is a depth of field scale; the second, later, type is a film speed indicator goes up to only 200 ASA!). Neither is especially useful, so I'd just stick a piece of leather there. Or you might be able to find a film speed indicator off another camera that could fit (it's always handy to know what film you put in your camera!)
He could even put something in there that would really be useful, like a bubble level.
optikhit
Photo gear player
The CLA process of my C6 began today. The winder has been removed by drilling the bolt off. FallisPhoto IS correct, that it is a brass bolt with both ends ground off!! We have changed both of the mirrors, the reflector and the beamsplitter. The reflector is sooo weak that nearly no light was reflected.
The coated beamsplitter has a very correct contrast, however, a little bit thinner than the original one, which caused a difficulty to align vertically. We have not found any micro adjust screws on the board which holds the BS. Therefore we just carefully placed the BS with some paper slice and glue.
Not finish yet...
FallisPhoto
Mentor
The winder has been removed by drilling the bolt off. FallisPhoto IS correct, that it is a brass bolt with both ends ground off!!
Well, that just figures. I thought to myself, "So -- it's a C6 camera. What's the most screwed-up way that he could have done that?" Almost inevitably, that was it.
NickTrop
Mentor
I don't have a Certo 6, mine is an Iskra - but, man, the better old folders really cranked out beautiful images - just something about them, as evident in the posts here. Shooting the Iskra - to me, as a near-spiritual experience. I've heard a lot of great things about the Certo 6, and have been tempted, but really have only room for 1 folder...
optikhit
Photo gear player
Not succeed in aligning the rangefinder system. Yestoday we have aligned the rangefinder horizontally with the round ptach image moving from right to left as the distance increase, but today we found the patch image moved in the opposite direction and not aligned. The focusing became very stiff now and the rangefinder does not move in some range less than 3m.
The beamsplitter seems not fit because it is only 1.5mm thick. It is difficult to make it align vertically. Maybe we should coat the BS again.
But first of all how to make the focusing smooth? Any idea?
Thanks.
The beamsplitter seems not fit because it is only 1.5mm thick. It is difficult to make it align vertically. Maybe we should coat the BS again.
But first of all how to make the focusing smooth? Any idea?
Thanks.
FallisPhoto
Mentor
Smooth it up in the usual way: clean it and add a little grease to the threads. There is a story that some of the Russians who bought these when they were new polished the helicals by putting pumice toothpaste on them and working the focus to smooth it, but that particular story is probably apocryphal, and I wouldn't try it unless I was really desperate. It might work, but at the cost of loosening up the threads.
optikhit
Photo gear player
How ro access the focusing system? It seems that we must remove the front cover with the struts.
FallisPhoto
Mentor
How ro access the focusing system? It seems that we must remove the front cover with the struts.
We are still talking about a Certo Six camera? One made by the Certo company? Like this one? http://farm1.static.flickr.com/24/95680544_6b63a6c527.jpg?v=0 I don't understand why you'd need to take the cover and struts off. You remove that black ring surrounding the lens (the one with the writing on it). What you need to do will become pretty self-evident after that.
Share:
-
This site uses cookies to help personalise content, tailor your experience and to keep you logged in if you register.
By continuing to use this site, you are consenting to our use of cookies.